


MySQL数据库安装
4629 字
23 分钟
MySQL数据库安装
- 1数据库初识
- 2SQL语句介绍
- 3MySQL数据库安装本文
- 4SQL语句基础
- 5SQL语句操作MySQL数据库基础
- 6MySQL之存储引擎
- 7MySQL之基本数据类型
- 8MySQL之约束条件
- 9MySQL之过滤条件
- 10多表查询和子查询
- 11多表查询练习题
- 12Navicate安装
- 13PDManer(元数建模)
- 14Tabby
- 15PyMySQL模块
- 16MySQL进阶知识之视图
- 17MySQL进阶知识之触发器
- 18MySQL进阶知识之事务
- 19MySQL进阶知识之存储过程
- 20MySQL进阶知识之函数
- 21MySQL进阶知识之流程控制
- 22MySQL进阶知识之索引
- 23MySQL进阶知识之事务隔离机制
- 24MySQL进阶知识之锁机制
- 25数据库的三大范式
- 26MySQL数据库小结
【一】各种服务器的端口
- MySQL :3306
- Redis : 6379
- MongoDB : 27017
- Django : 8000
- flask : 5000
【二】MySQL数据库介绍
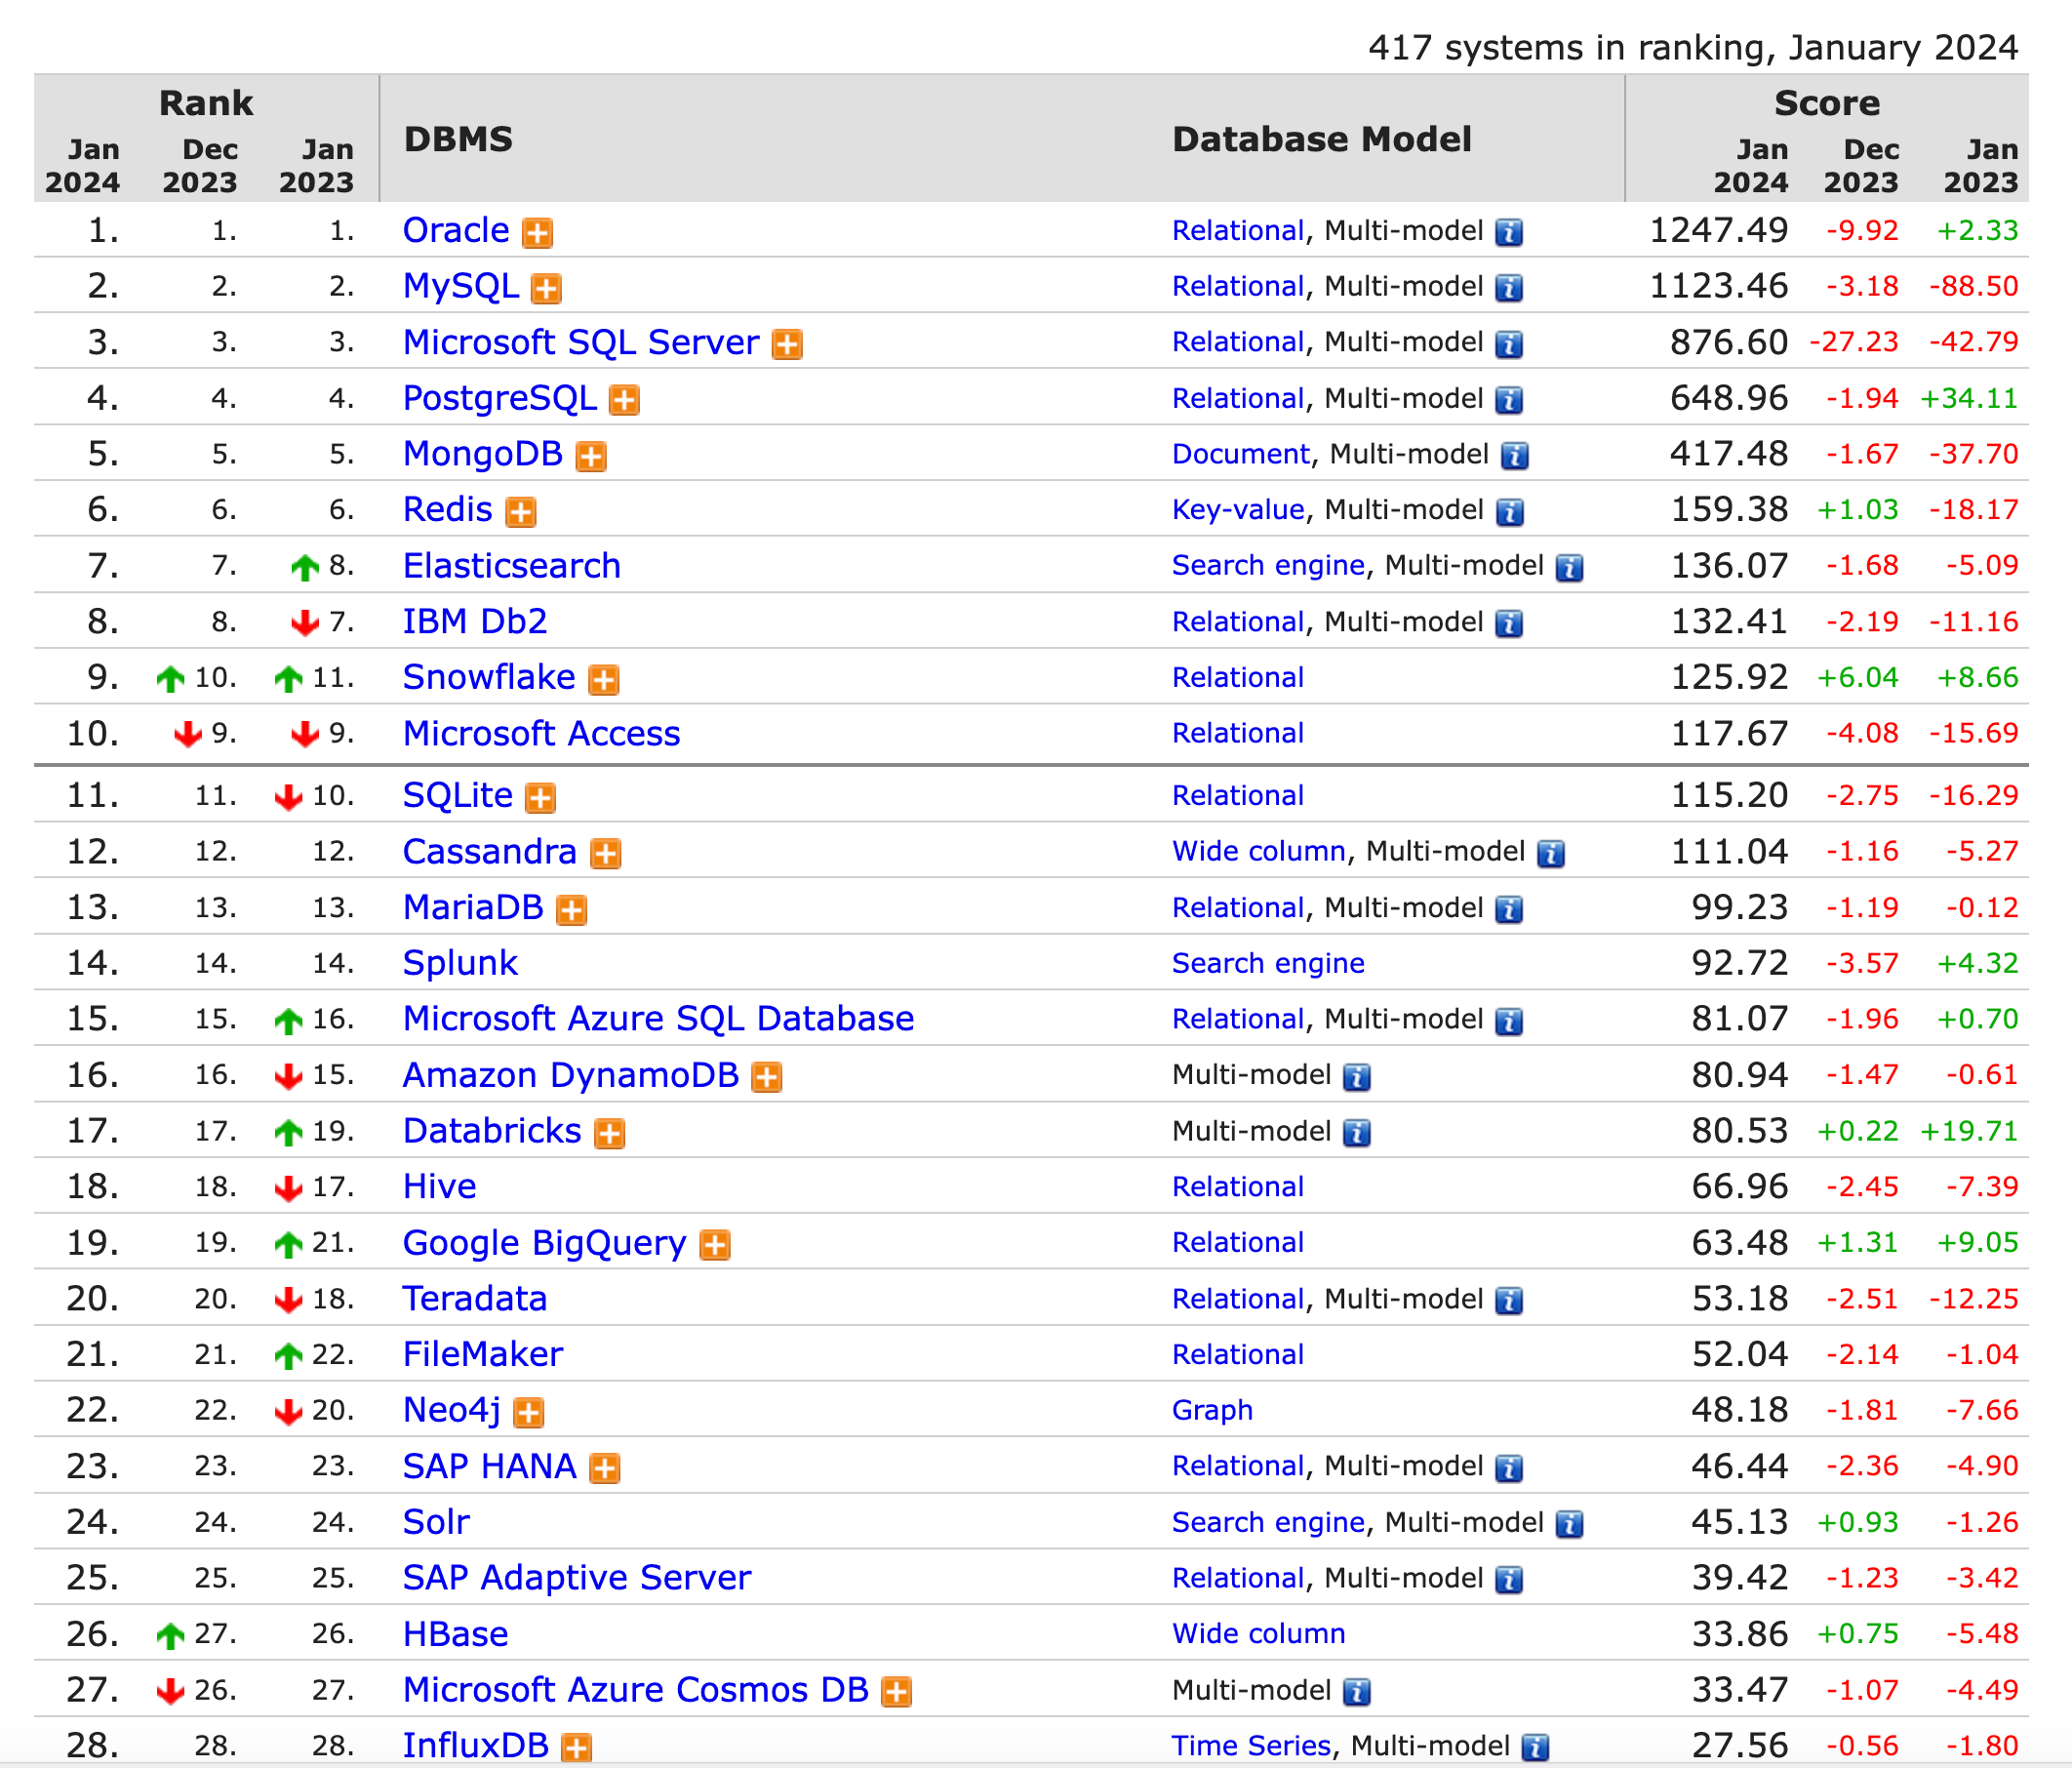
- MySQL是一个开源免费的关系型数据库管理系统,由瑞典MySQL AB 公司开发,目前属于 Oracle 旗下公司。
- MySQL 最流行的关系型数据库管理系统,在 WEB 应用方面MySQL是最好的 RDBMS (Relational Database Management System,关系数据库管理系统) 应用软件之一,
- 具有成本低、速度快、体积小且开放源代码等优点。
【三】MySQL安装(Windows)
【1】下载
(1)打开官网
- 打开网址,https://www.mysql.com
- 点击导航DOWNLOADS)

(2)选择MySQL Community
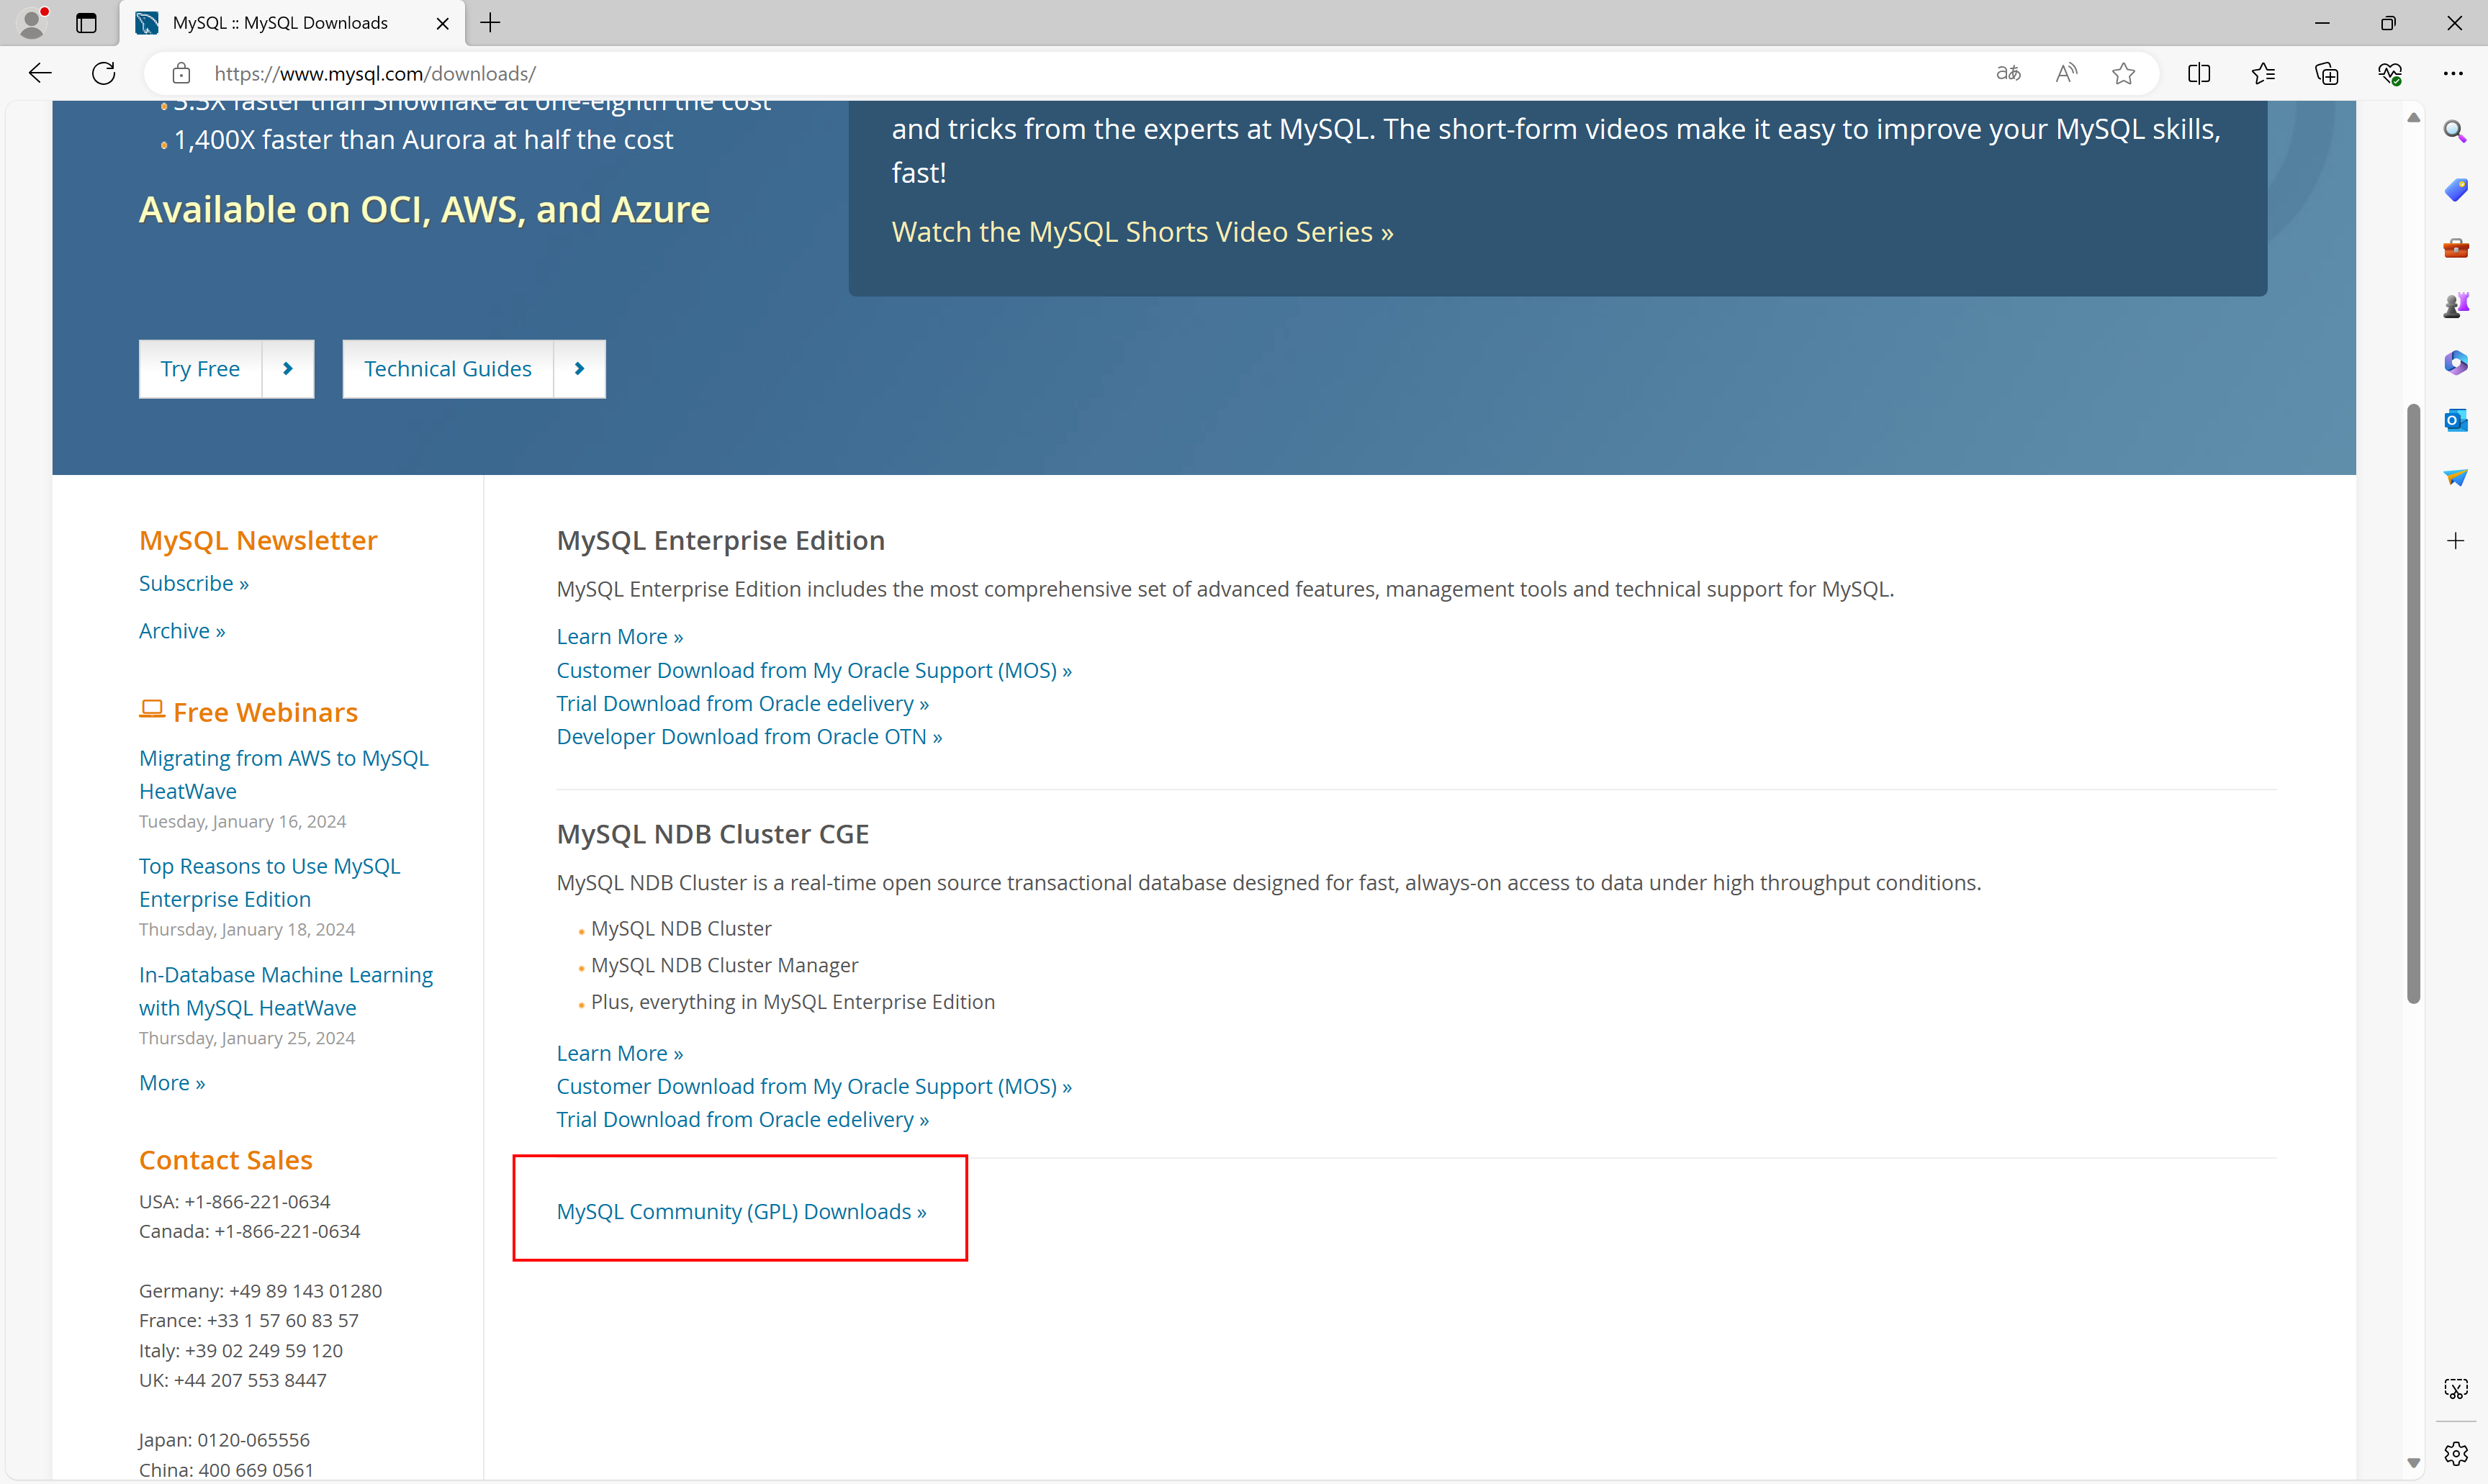
(3)选择MySQL Community Server

(4)选择版本
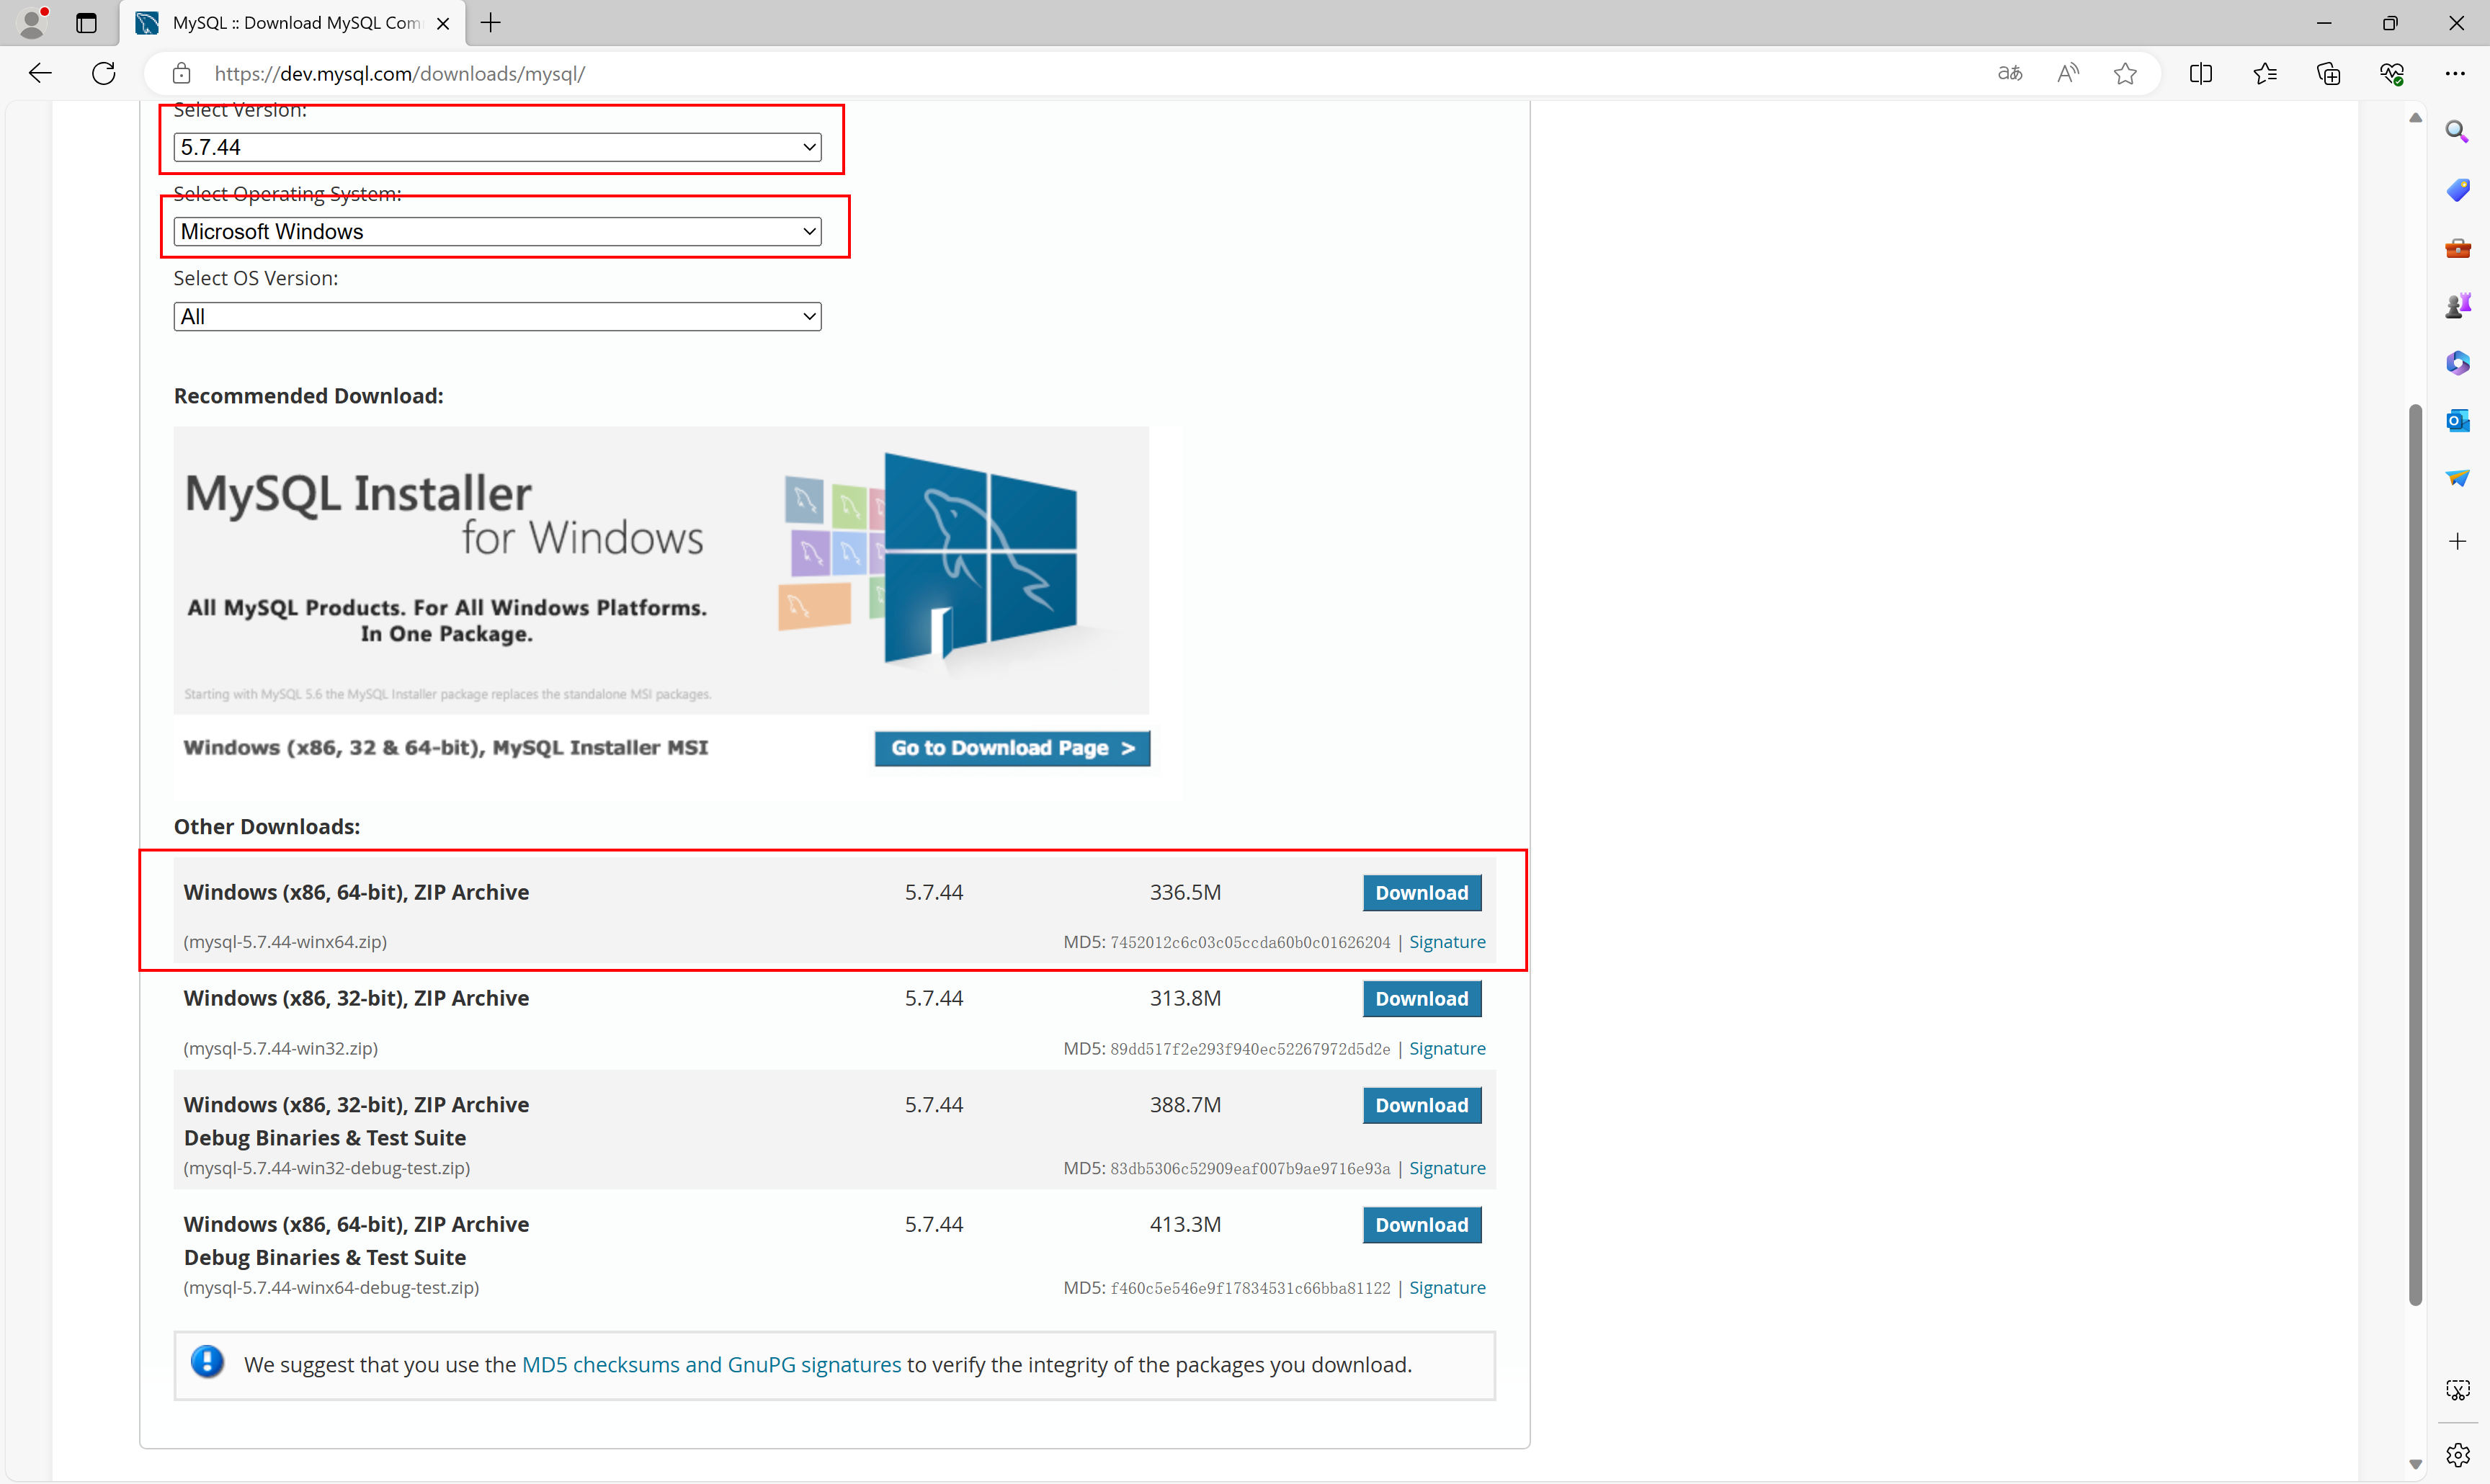
(5)开始下载
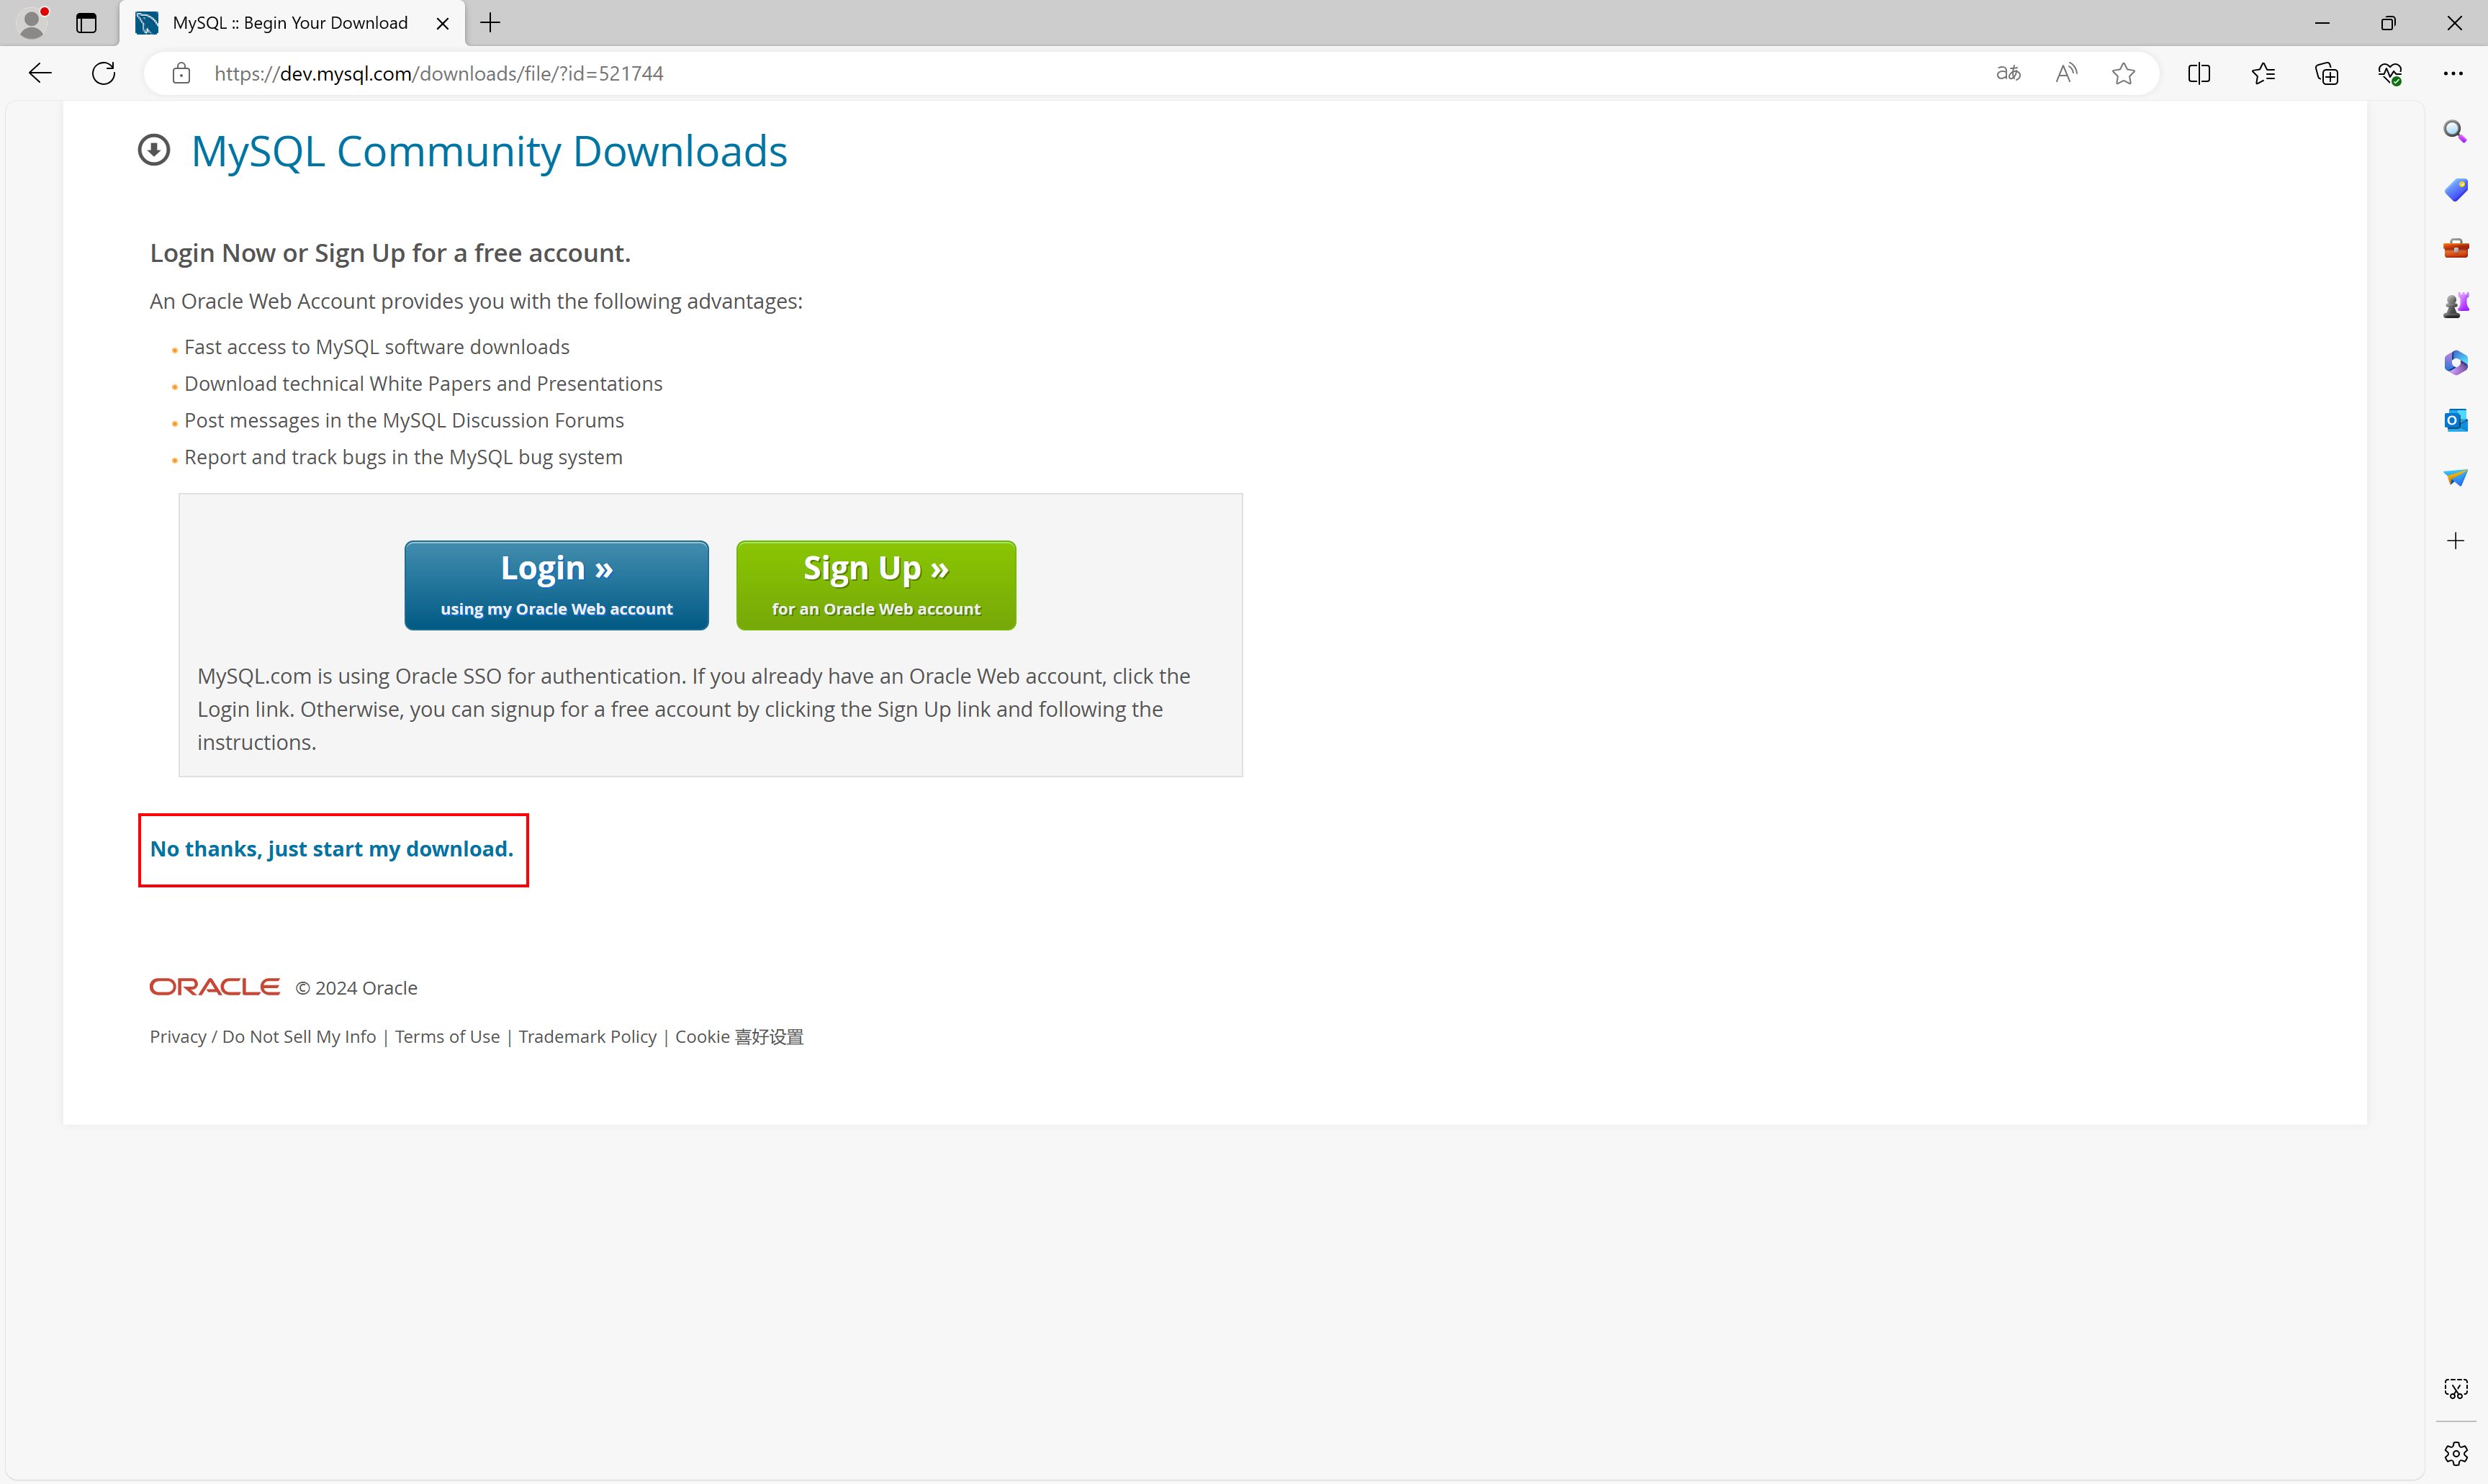
【2】解压文件
- 把下载到本地的zip文件手动解压,将解压之后的文件夹放到专门保存开发软件的目录下,这个目录就是mysql的安装目录。
- 注意,目录路径不能出现中文,不能出现空格等特殊符号,否则会出错的!!!
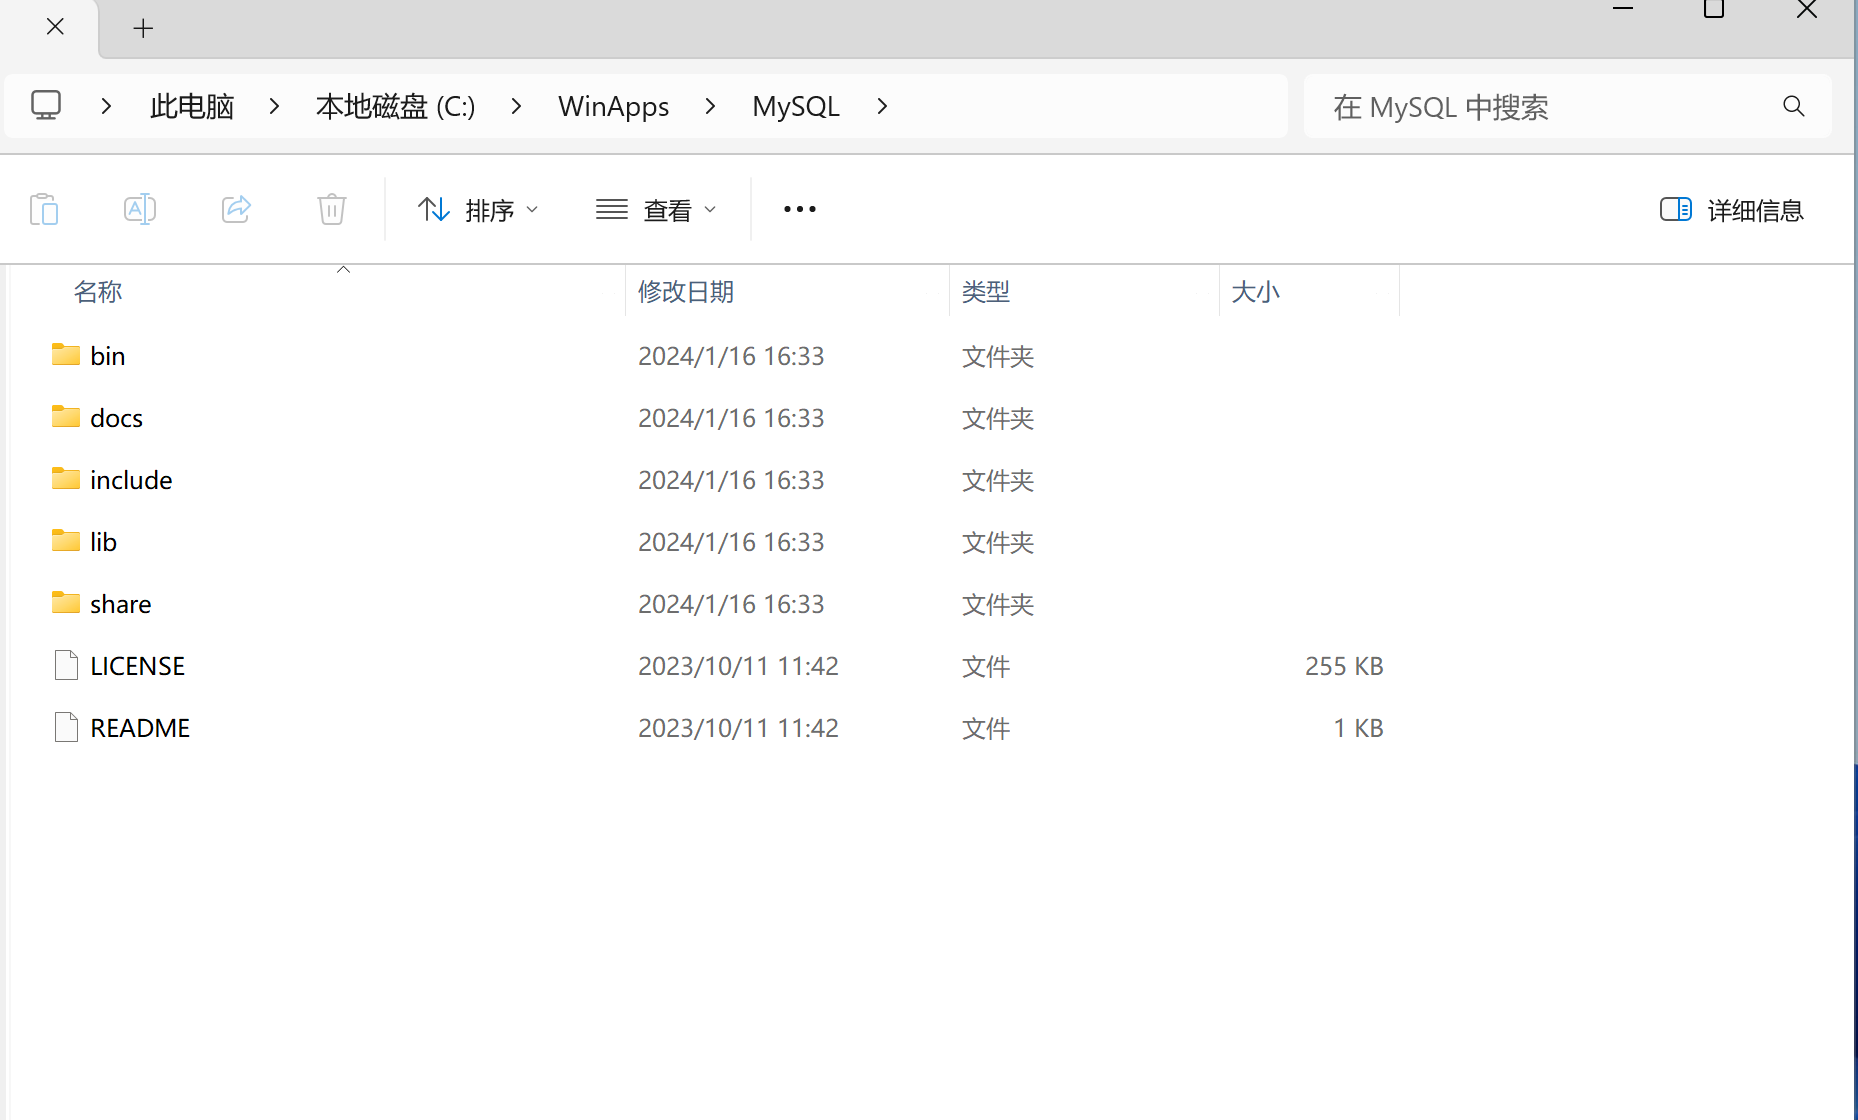
【3】配置环境变量
(1)打开设置
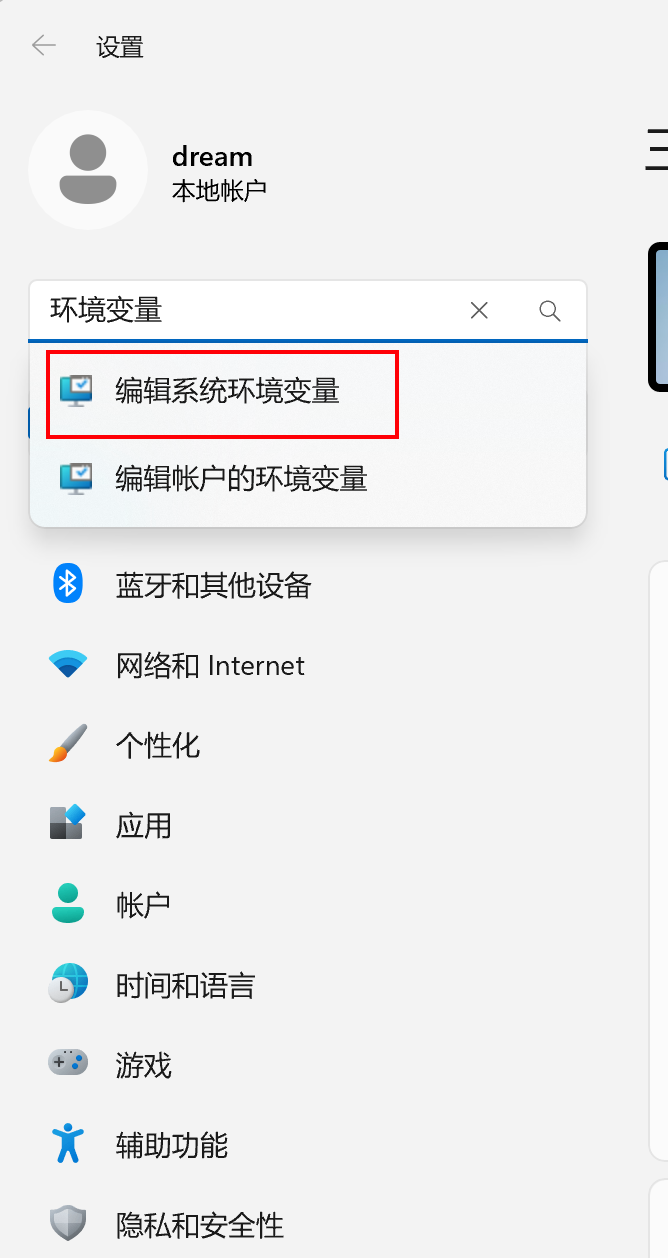
(2)打开环境变量
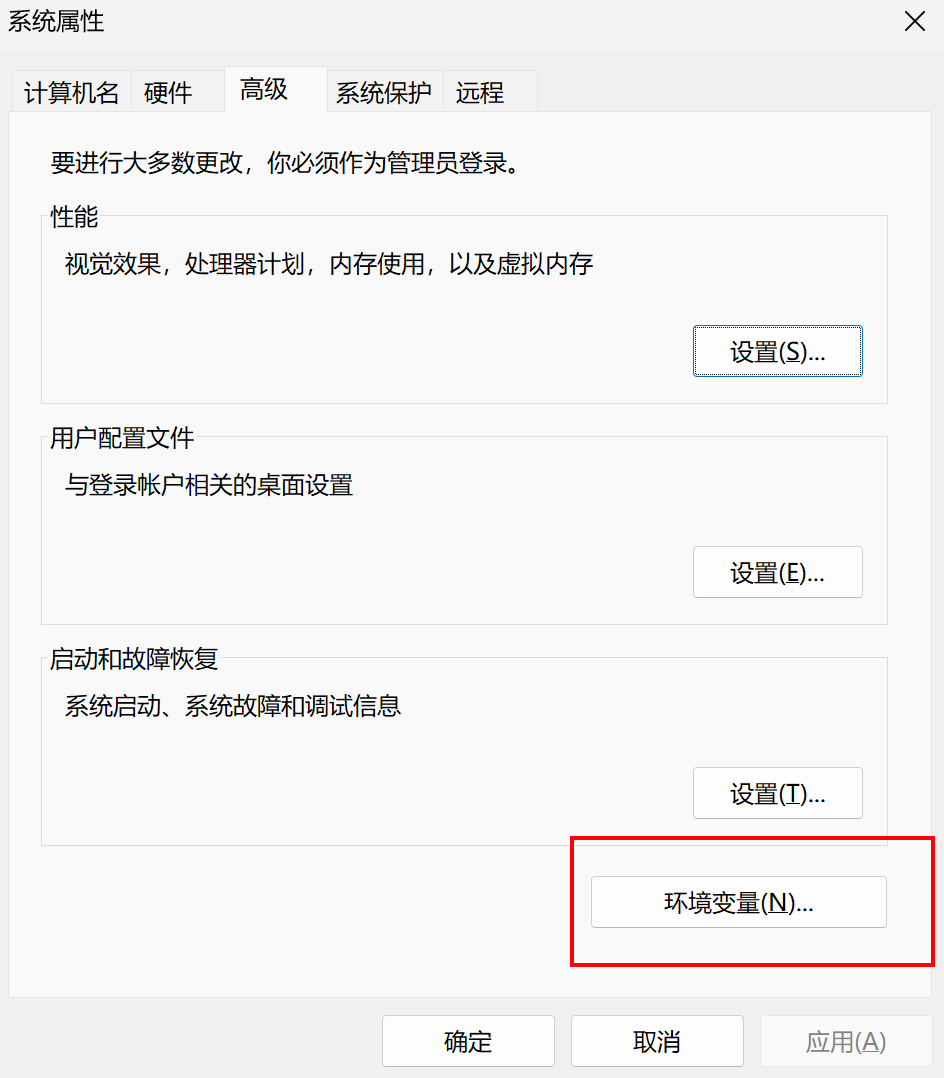
(3)编辑环境变量

(4)添加环境变量
- 将MySQL的 bin 路径添加进去

【4】初始化准备工作
(1)创建data目录
- 主要用于存放mysql数据库以及数据的。
注意:是mysql的安装目录!!!!
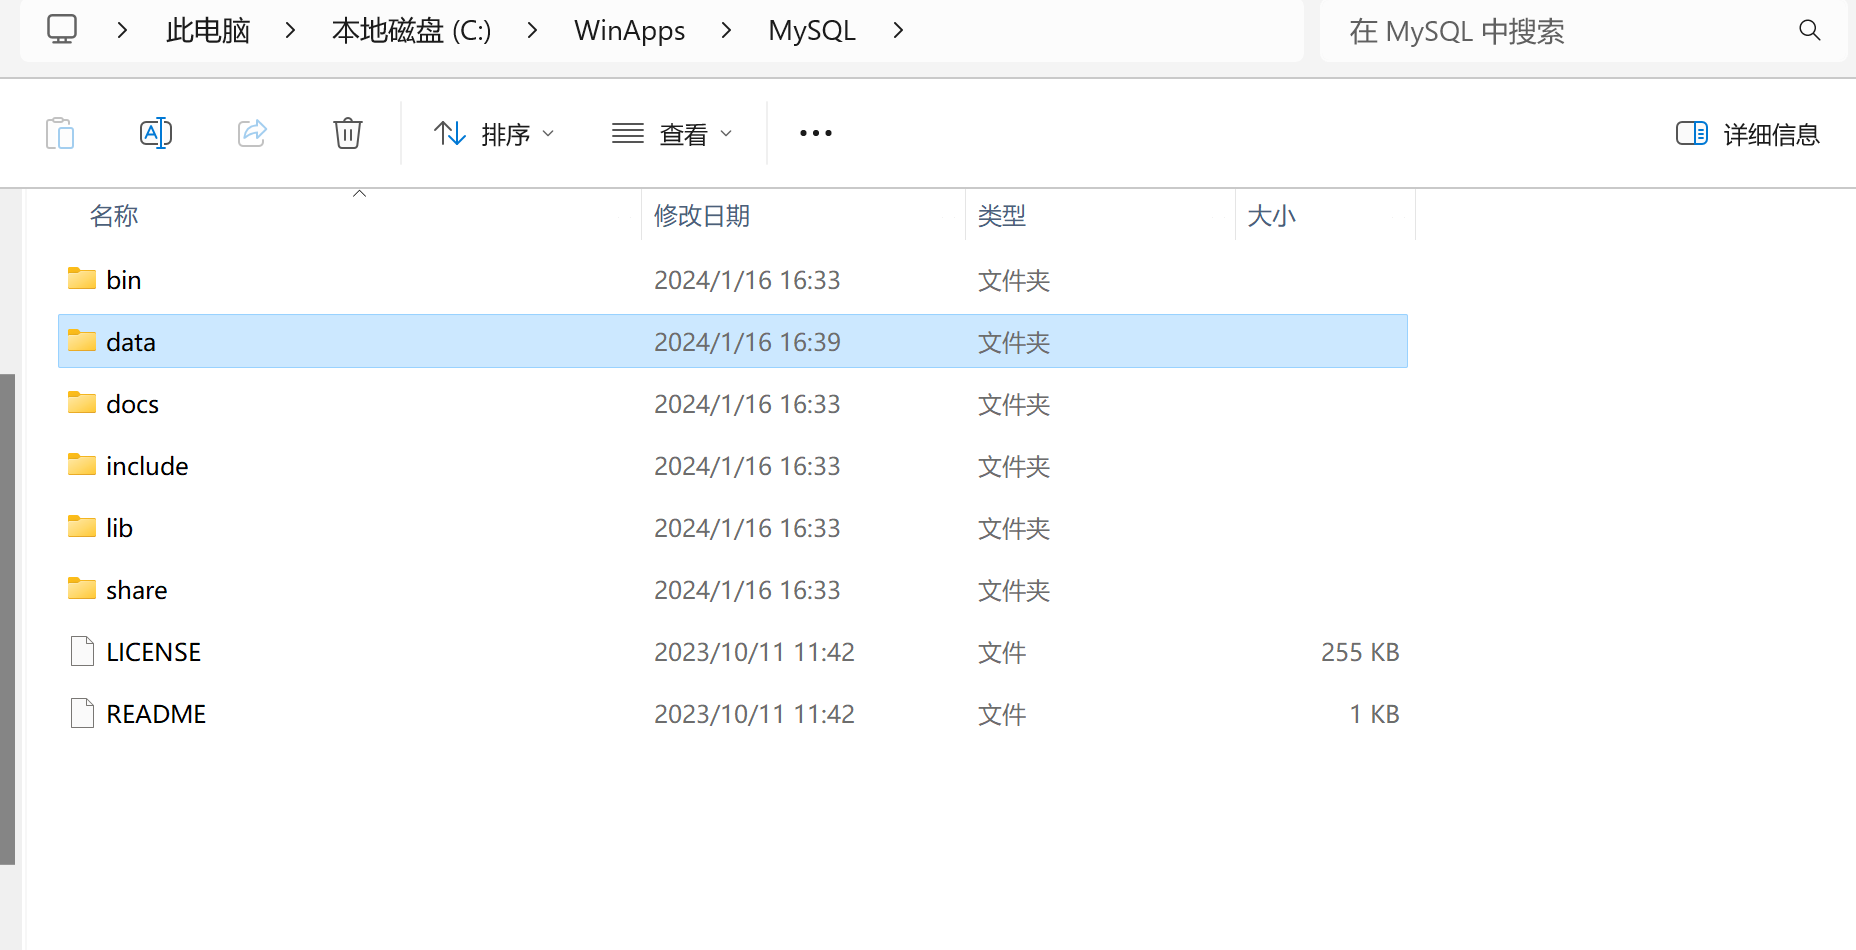
(2)创建配置文件
- mysql在windows下的配置文件,叫 my.ini,默认是没有的,我们需要手动创建。
- 配置文件内容如下
- 注意:basedir和datadir的路径要根据自己的路径如实填写
[mysqld]# 设置3306端口port=3306# 设置mysql的安装目录basedir="C:\WinApps\MySQL"# 设置mysql数据库的数据的存放目录,就是前面手动创建的data目录datadir="C:\WinApps\MySQL\data"# 允许最大连接数max_connections=200# 允许连接失败的次数。max_connect_errors=10# 服务端使用的字符集默认为utf8mb4character-set-server=utf8mb4# 创建新表时将使用的默认存储引擎default-storage-engine=INNODB# 默认使用“mysql_native_password”插件认证, mysql_native_passworddefault_authentication_plugin=mysql_native_password[mysql]# 设置mysql网络通信的默认字符集default-character-set=utf8mb4[client]# 设置mysql客户端连接服务端时默认使用的端口port=3306# 设置mysql客户端的默认字符集default-character-set=utf8mb4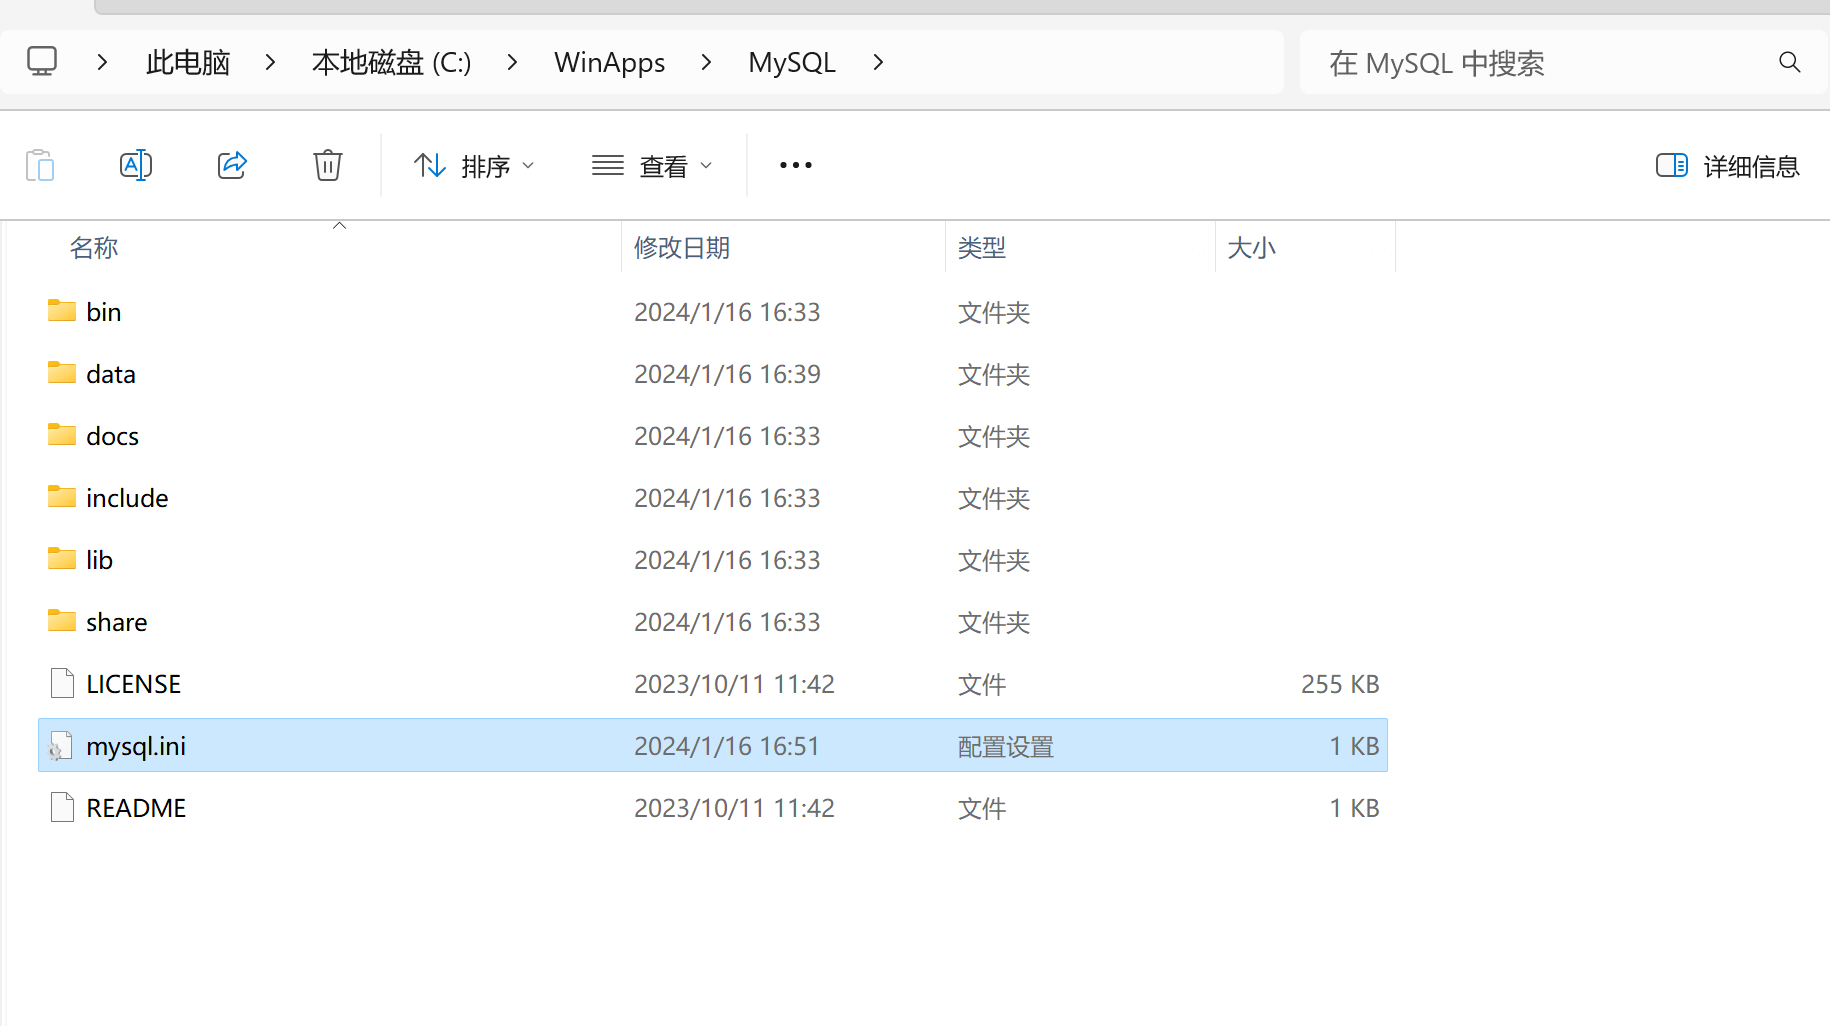

【5】初始化数据库
(1)打开cmd窗口

(2)执行初始化
- 输入以下命令,让数据库完成初始化操作。
mysqld --initialize --console
- 初始化成功结果如上,会自动生成一串随机的MySQL秘钥(一会有用)
【6】注册系统服务
(1)注册系统服务
- 把mysql注册到操作系统作为系统服务,保证将来电脑重启了就可以开机自启了
- 以管理员身份运行cmd窗口
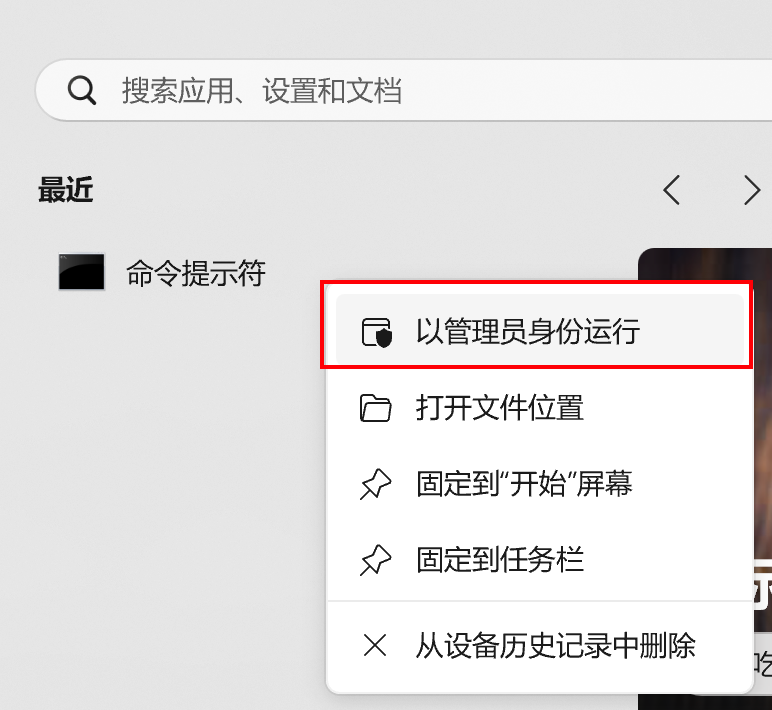
mysqld --install- 注册前是看不到MySQL系统服务的
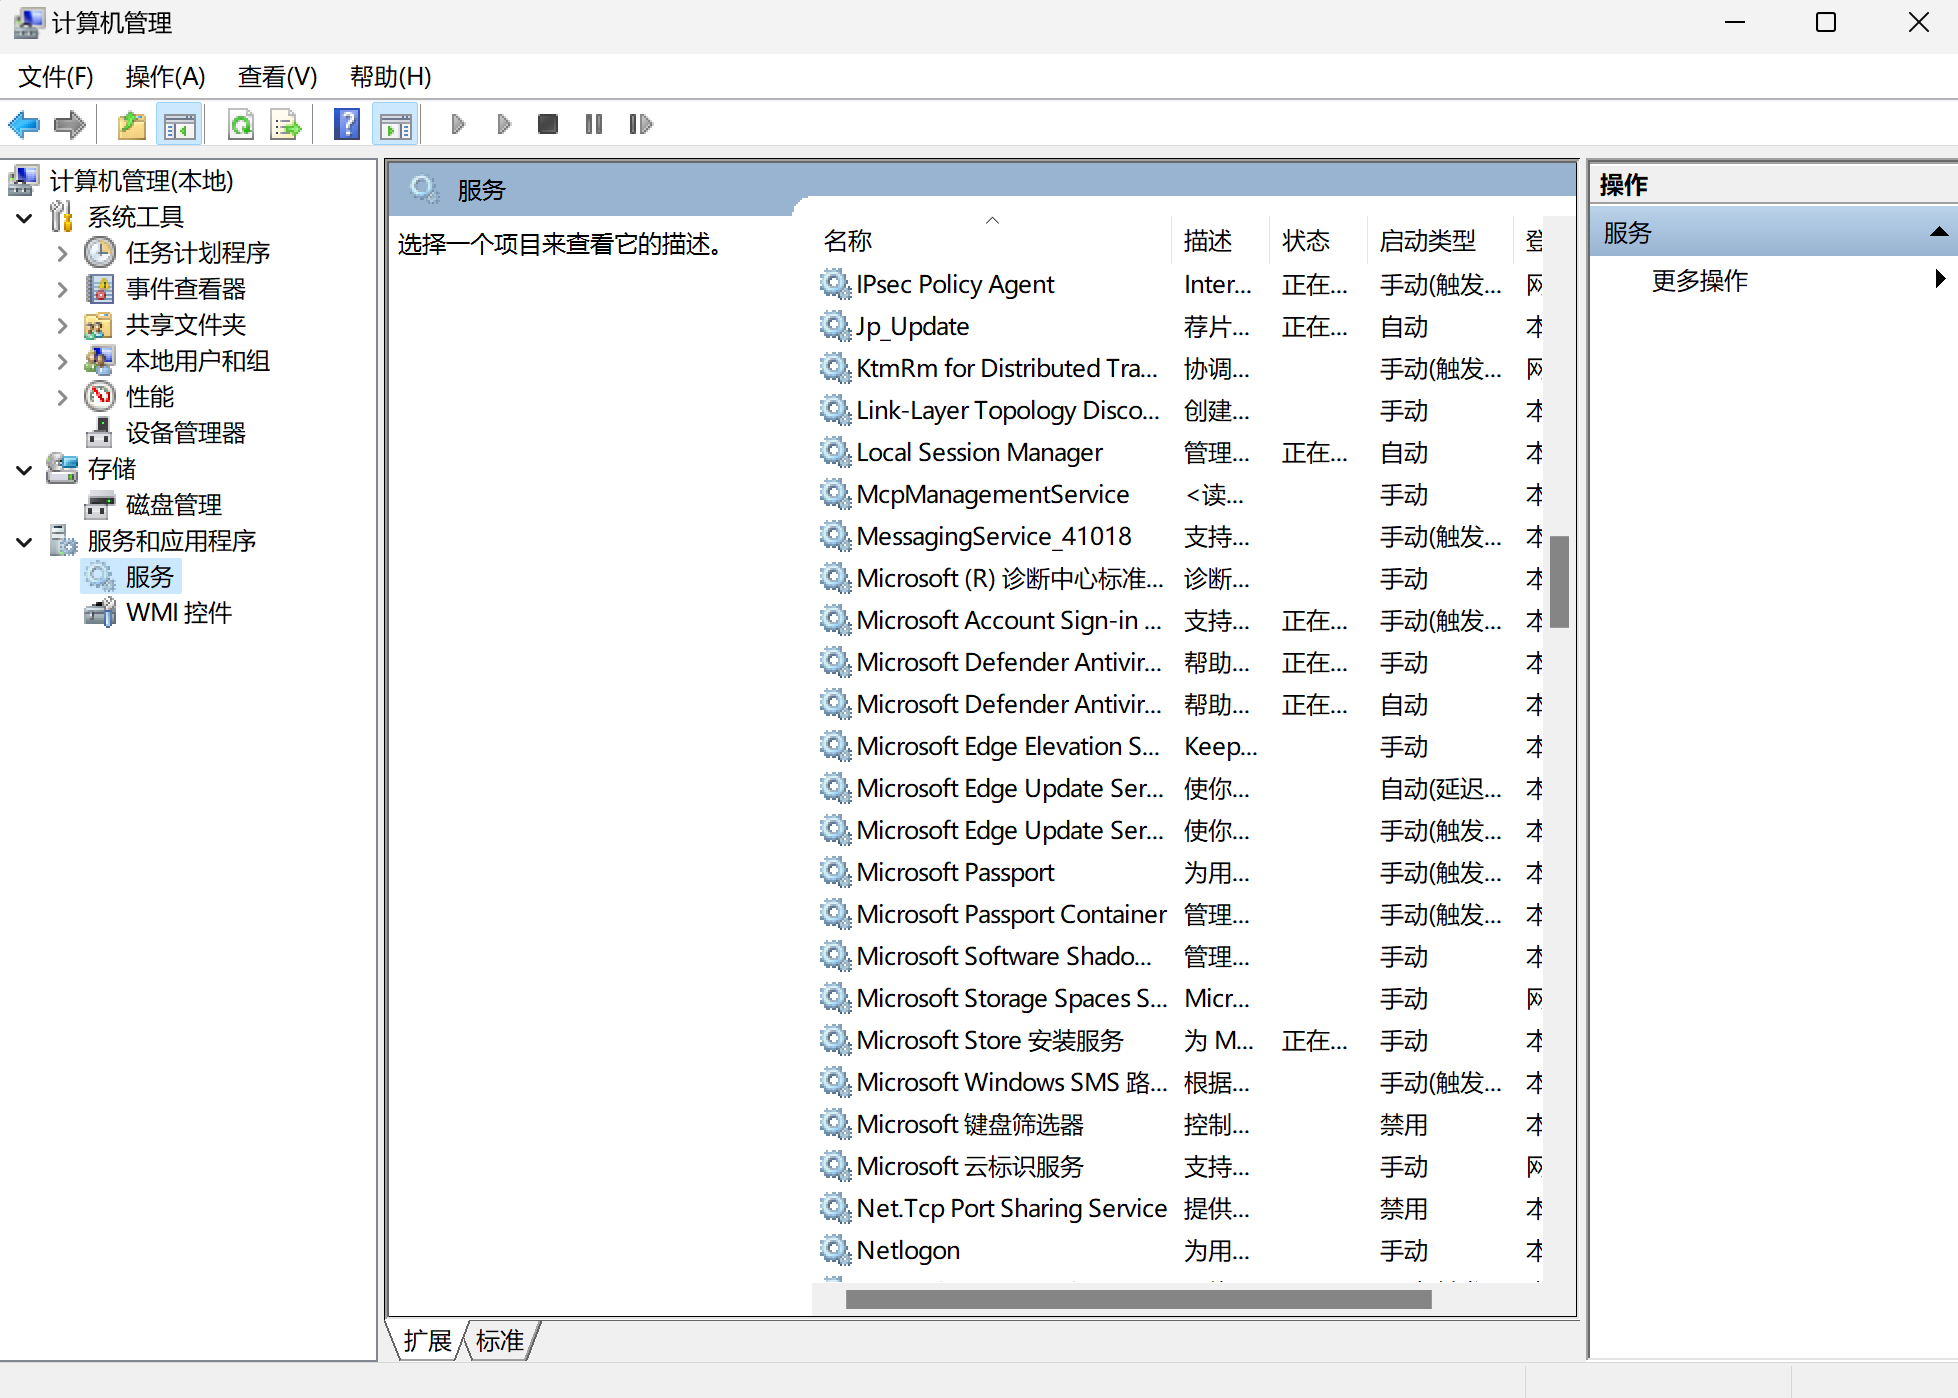
- 注册成功

- 注册后的系统服务,多了一个MySQL服务

(2)注销系统服务
- 注销服务,用于卸载mysql的,别乱用。
mysqld --remove【7】启动MySQL服务
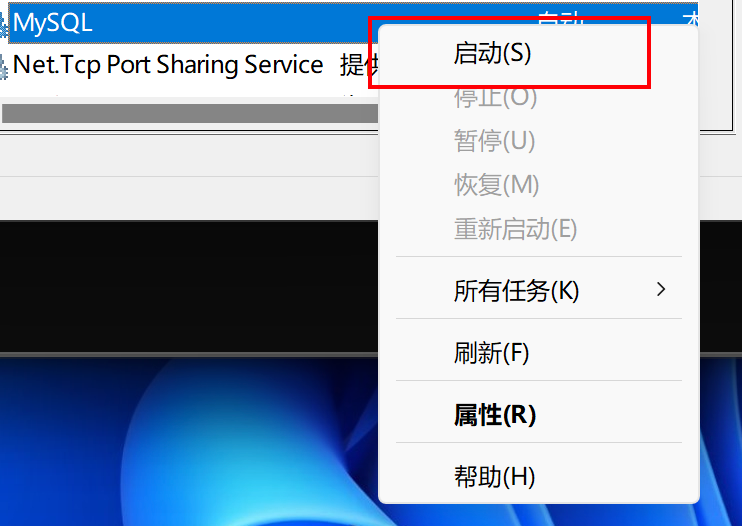
(1)方式一
- 直接在上述服务窗口右键启动
(2)方式二
- 启动
net start MySQL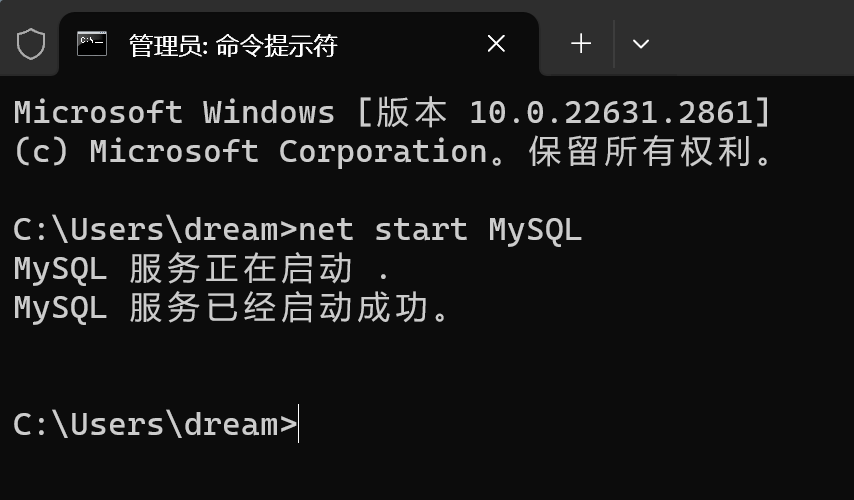
- 关闭
net stop MySQL- 重启
net start MySQL【四】MySQL安装(MacOS)
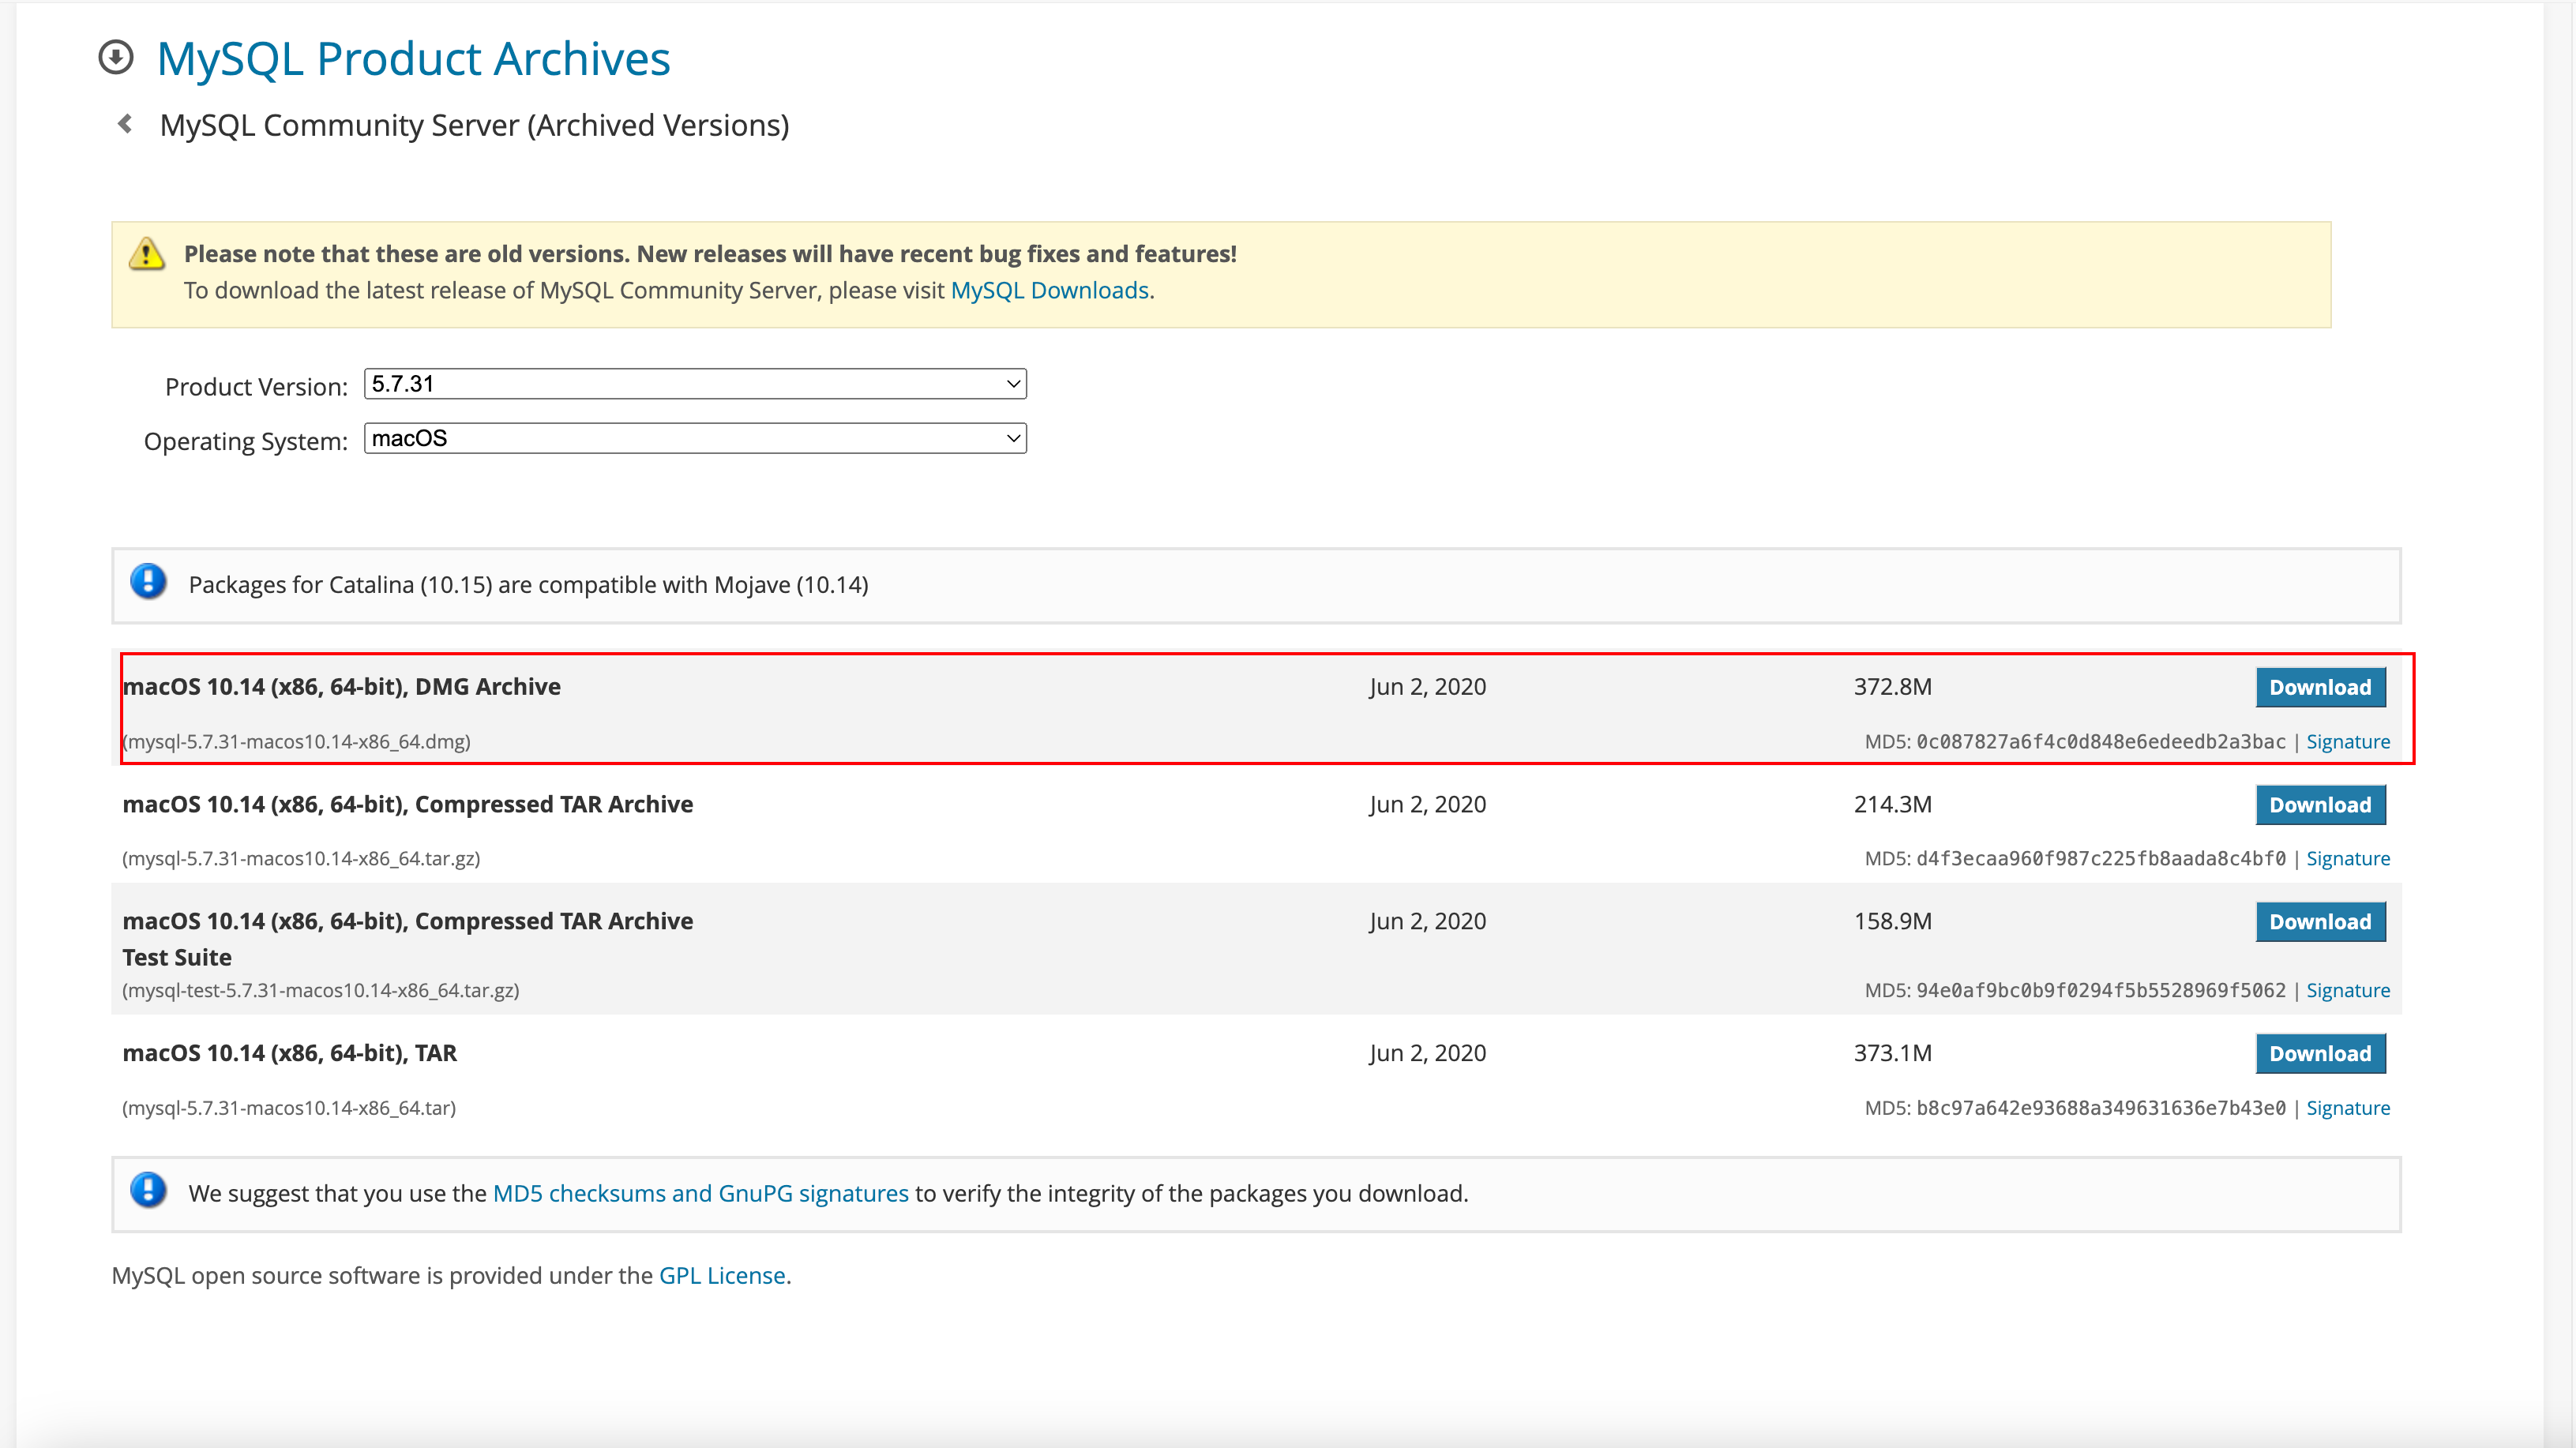
【1】下载
- MySQL :: Download MySQL Community Server (Archived Versions)
- 百度盘资源链接:https://pan.baidu.com/s/1x8BH9_dEn9hUgyIJXC7cIw?pwd=qaae
【2】安装
(1)双击安装器

(2)继续
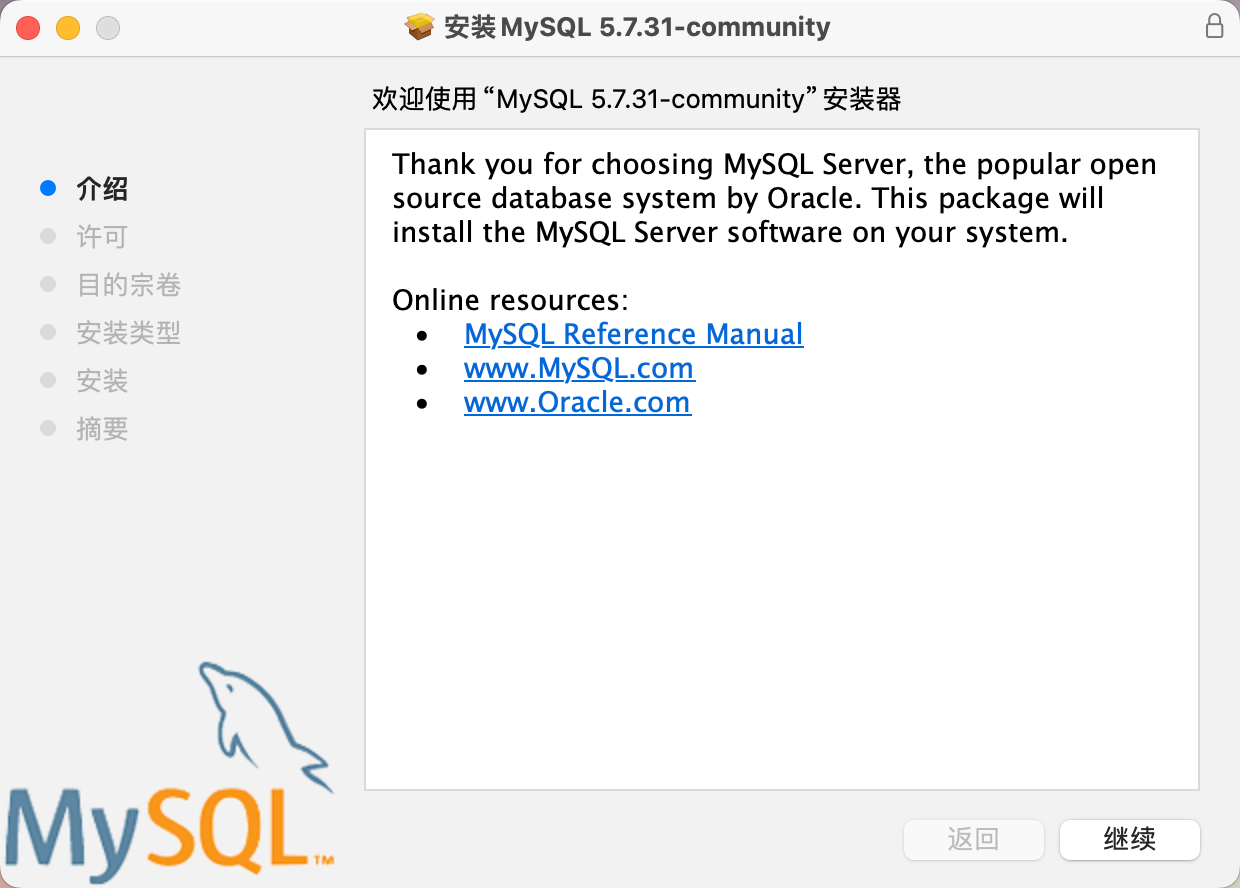
(3)继续

- 同意

- 所有用户
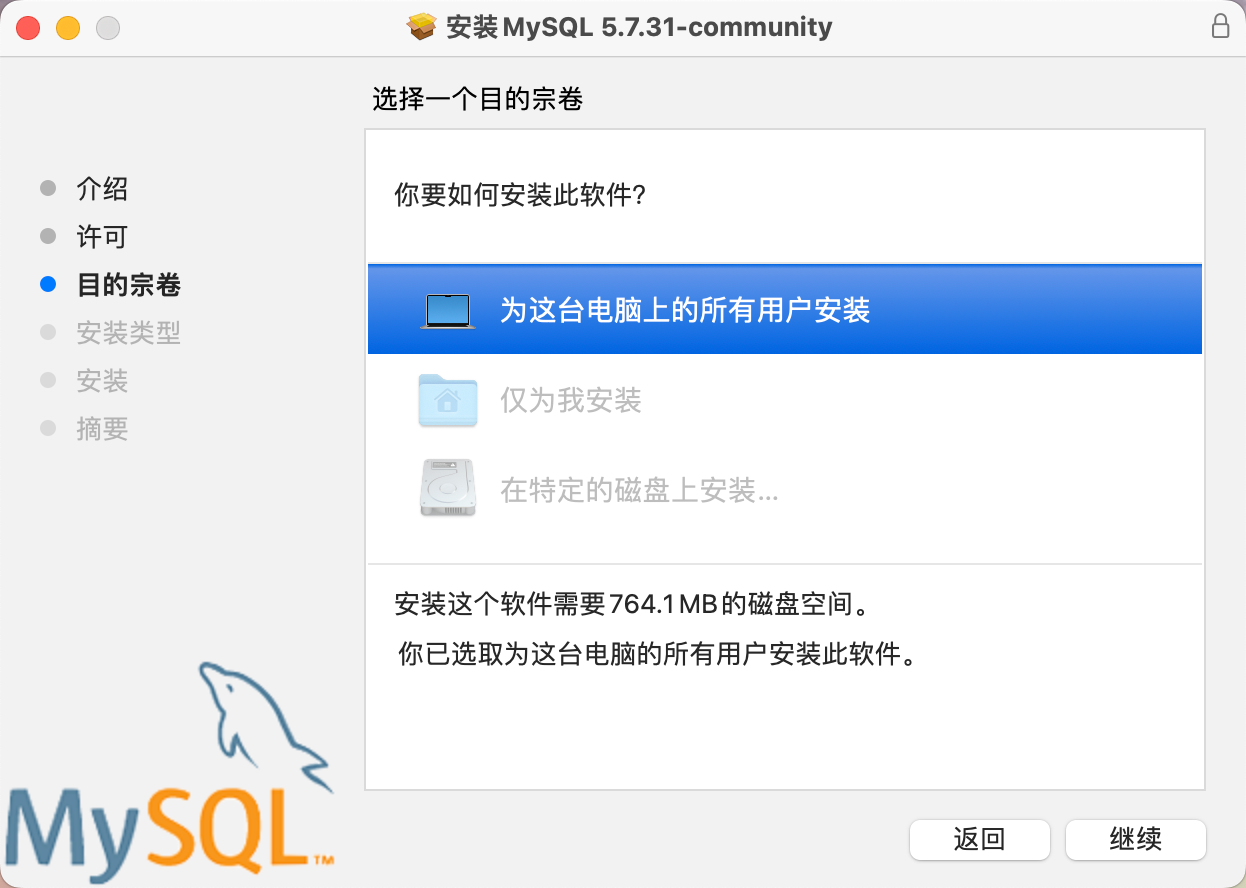
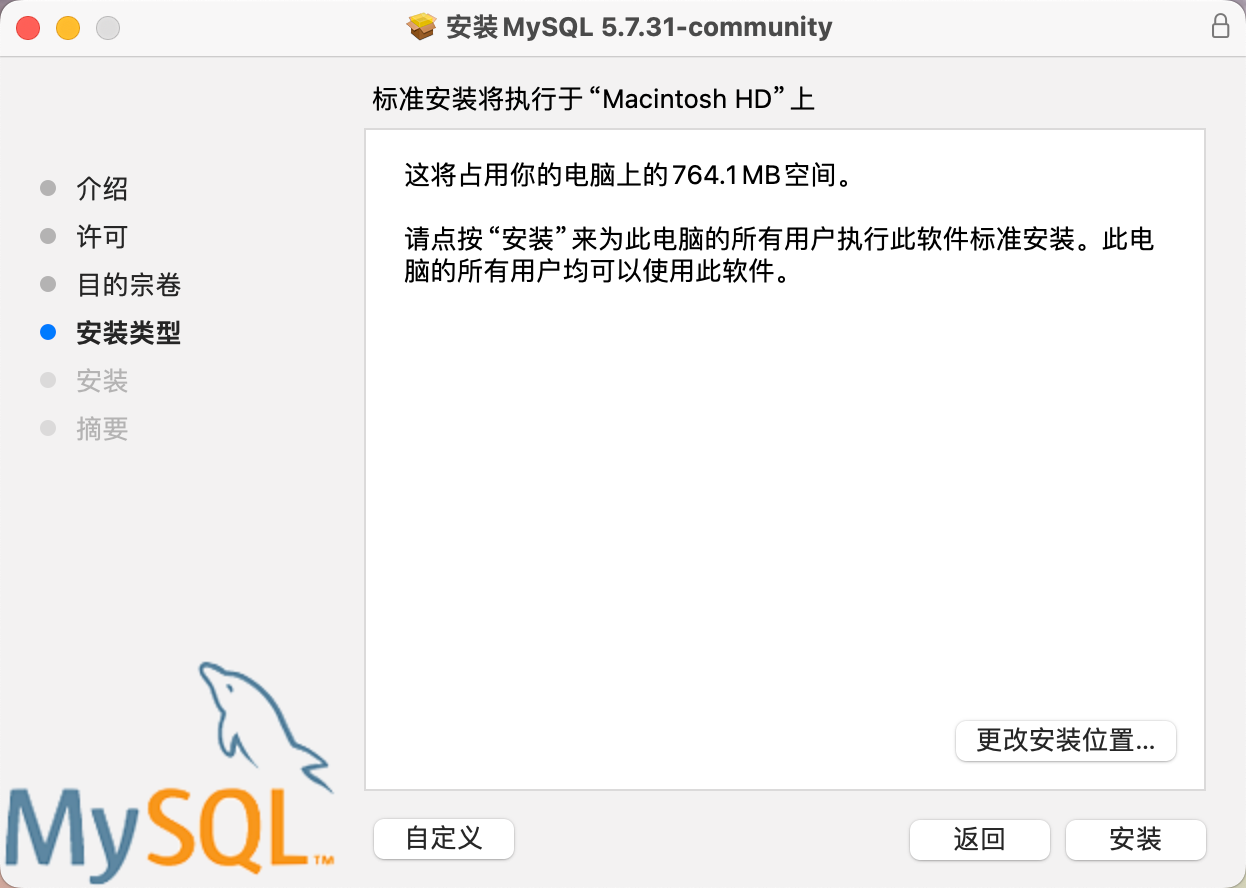
(4)安装
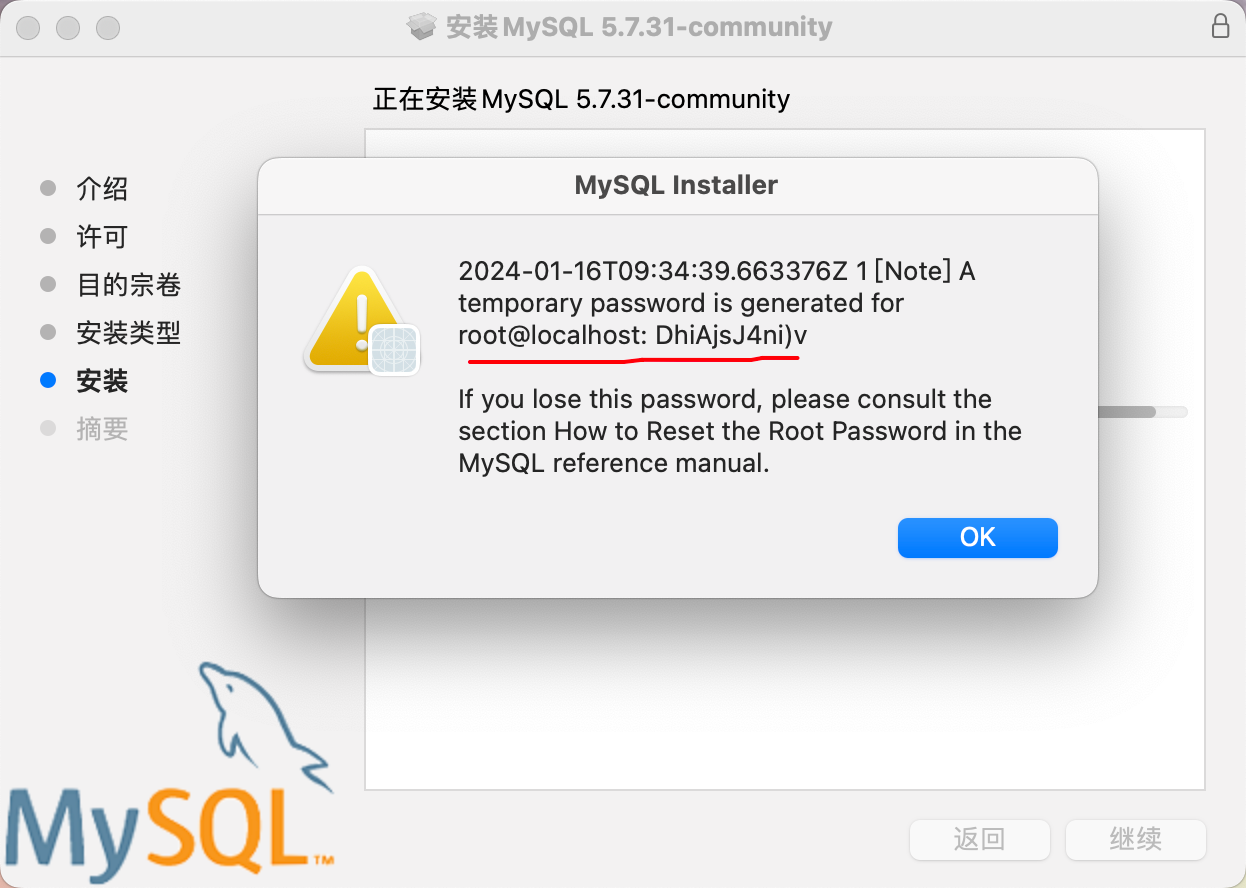
(5)安装成功
- 获取到一个随机的密码
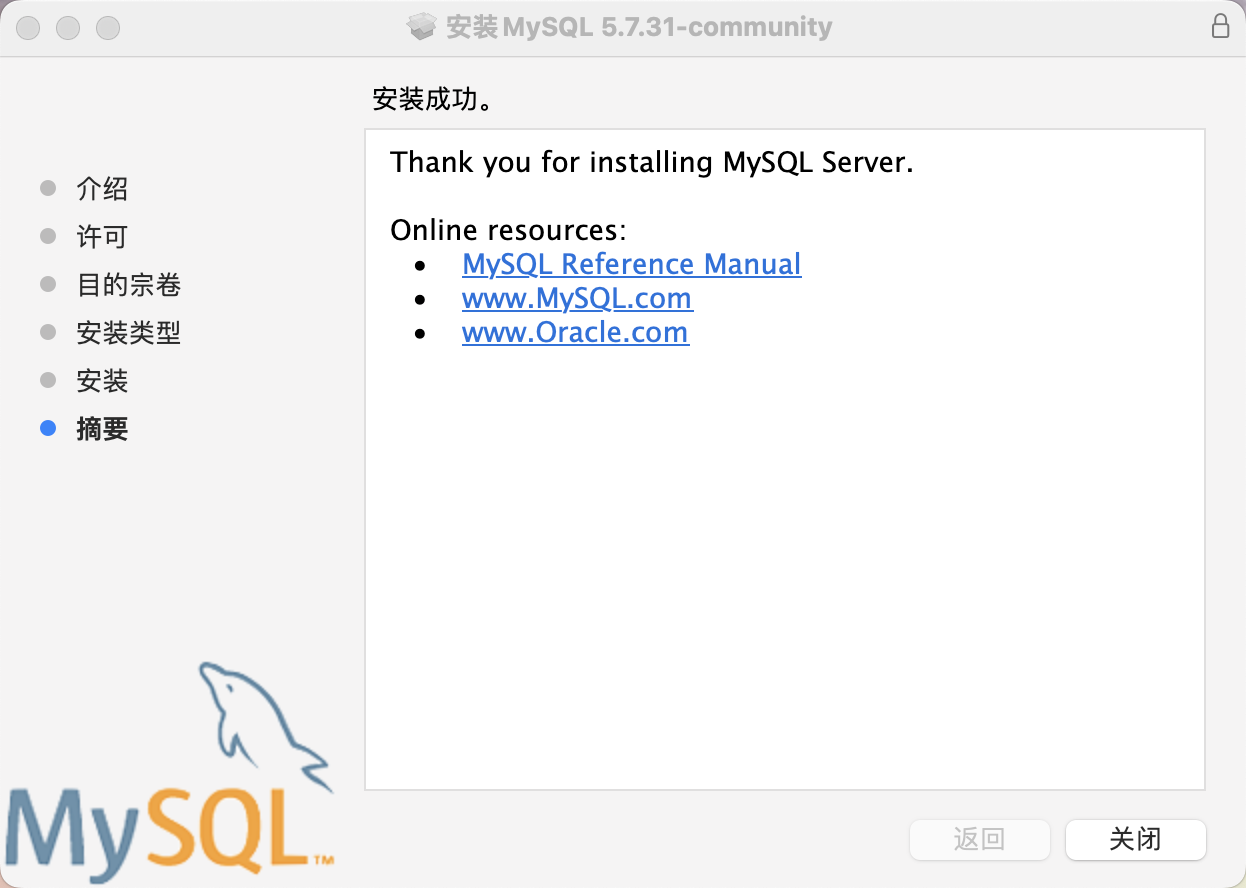
(6)关闭
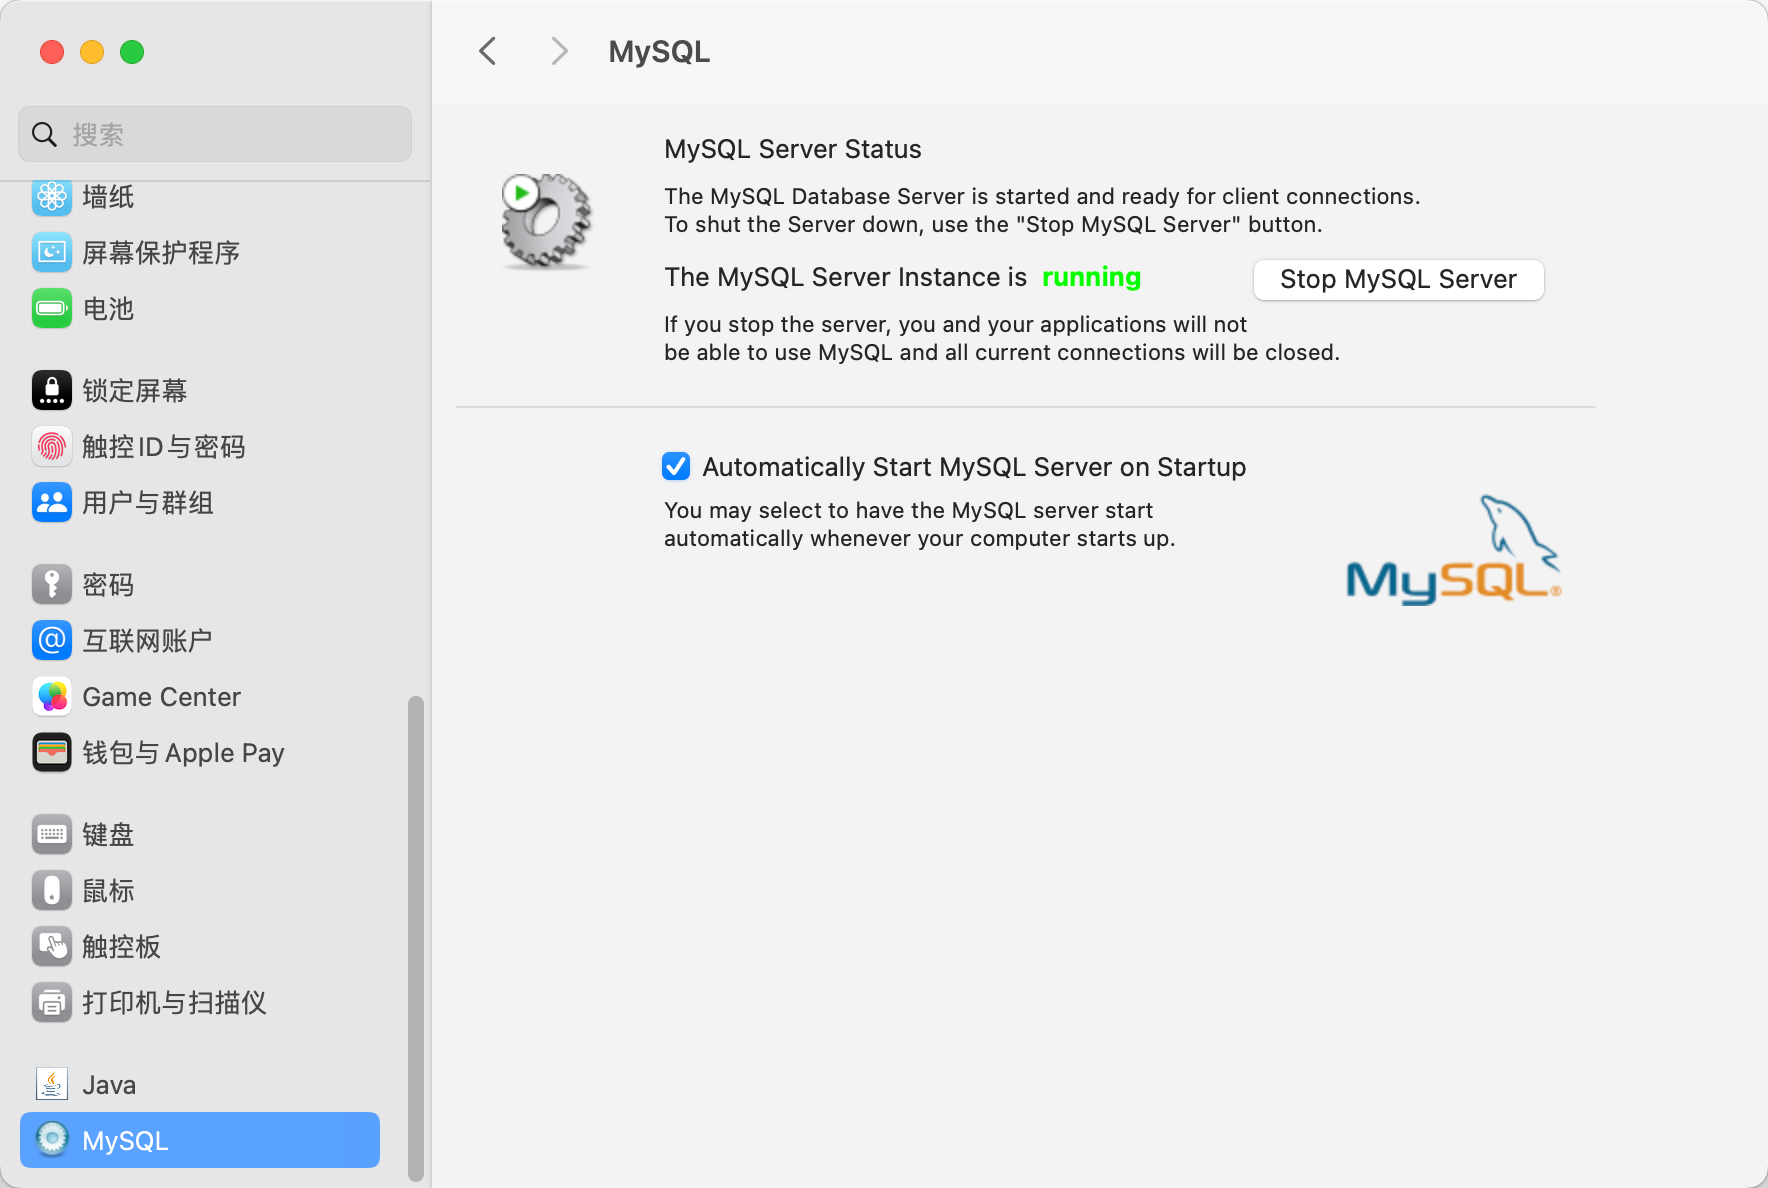
【3】启动MySQL
- 打开设置,启动MySQL
【4】配置mysql环境变量
(1)查看安装的MySQL位置
cd /usr/local/ls
(2)配置环境变量
- 打开配置文件
open -e .bash_profile- 添加下面的配置内容
export PATH=/usr/local/bin:/usr/bin:/bin:/usr/sbin:/sbin
export PATH=${PATH}:/usr/local/mysql/bin- 打开配置文件
open -e ~/.zshrc- 追加下述配置
# MySQL environment variablesexport MYSQL_HOME=/usr/local/mysqlexport PATH=$MYSQL_HOME/bin:$PATHexport PATH=$MYSQL_HOME/usr/libexec:$PATHexport LD_LIBRARY_PATH=$MYSQL_HOME/lib:$LD_LIBRARY_PATH【5】配置mysql配置文件
- 无论是homebrew等方式,在Mac下都是不会生成my.cnf文件,因为已经使用了最优默认值
- 如果需要也可以自行新建或配置/etc/my.cnf
(1)查看my.cnf的加载顺序
mysql --verbose --help | grep my.cnf
- 默认安装位置 /usr/local/mysql
(2)示例文件
- 一般情况下/usr/local/mysql/support-files/下不会有示例文件,如果有可以执行以下命令
cd /usr/local/mysql/support-files/sudo cp my-huge.cnf /etc/my.cnf- 如果没有,也可以手动创建my.cnf文件
sudo vim /etc/my.cnf- 阉割版配置文件
# For advice on how to change settings please see# http://dev.mysql.com/doc/refman/5.6/en/server-configuration-defaults.html# *** DO NOT EDIT THIS FILE. It's a template which will be copied to the# *** default location during install, and will be replaced if you# *** upgrade to a newer version of MySQL.
[mysqld]
# Remove leading # and set to the amount of RAM for the most important data# cache in MySQL. Start at 70% of total RAM for dedicated server, else 10%.# innodb_buffer_pool_size = 128M
# Remove leading # to turn on a very important data integrity option: logging# changes to the binary log between backups.# log_bin
# These are commonly set, remove the # and set as required.# basedir = .....# datadir = .....# port = .....# server_id = .....# socket = .....
#服务端口号 默认3306port = 3306server_id = 1# mysql安装根目录basedir = /usr/local/mysql# mysql数据文件所在位置datadir = /usr/local/mysql/data
# 跳过密码登录skip-grant-tables
# 数据库默认字符集,主流字符集支持一些特殊表情符号(特殊表情符占用4个字节)character-set-server = utf8mb4
# 数据库字符集对应一些排序等规则,注意要和character-set-server对应collation-server = utf8mb4_general_ci
# 设置client连接mysql时的字符集,防止乱码init_connect='SET NAMES utf8mb4'
# 是否对sql语句大小写敏感,1表示不敏感,8.0需要在初始化时候设置# lower_case_table_names = 1
# 最大连接数max_connections = 1000
#最大错误连接数max_connect_errors = 1200
# wait_timeout = 1814400# Remove leading # to set options mainly useful for reporting servers.# The server defaults are faster for transactions and fast SELECTs.# Adjust sizes as needed, experiment to find the optimal values.# join_buffer_size = 128M# sort_buffer_size = 2M# read_rnd_buffer_size = 2M
[client]default-character-set=utf8
[mysql]# 不需要每次输入验证码即可登陆user="root"password="1314521"default-character-set=utf8mb4- 完整版配置文件
## FromDual configuration file template for MySQL, Galera Cluster, MariaDB and Percona Server# Location: %MYCNF%# This template is intended to work with MySQL 5.7 and newer and MariaDB 10.0 and newer# Get most recent updated from here:# https://www.fromdual.com/mysql-configuration-file-sample#
[client]
port = %PORT% # default 3306socket = %SOCKET% # Use mysqld.sock on Ubuntu, conflicts with AppArmor otherwise
[mysql]
no_auto_rehashmax_allowed_packet = 16Mprompt = '\u@\h [\d]> ' # 'user@host [schema]> 'default_character_set = utf8 # Possibly this setting is correct for most recent Linux systems
[mysqldump]
max_allowed_packet = 16M
[mysqld_safe] # Becomes sooner or later obsolete with systemd
open_files_limit = 8192 # You possibly have to adapt your O/S settings as welluser = mysqllog-error = %INSTANCEDIR%/log/%UNAME%_%INSTANCE%_error.log # Adjust AppArmor configuration: /etc/apparmor.d/local/usr.sbin.mysqld
[mysqld]
# Connection and Thread variables
port = %PORT% # default 3306socket = %SOCKET% # Use mysqld.sock on Ubuntu, conflicts with AppArmor otherwisebasedir = %BASEDIR%datadir = %DATADIR%# tmpdir = '%INSTANCEDIR%/tmp'# innodb_tmpdir = '%INSTANCEDIR%/tmp' # MySQL 5.7
max_allowed_packet = 16Mdefault_storage_engine = InnoDB# explicit_defaults_for_timestamp = 1 # MySQL 5.6, test carefully! This can have an impact on application.# disable_partition_engine_check = true # Since MySQL 5.7.17 to 5.7.20. To get rid of nasty message in error log
# character_set_server = utf8mb4 # For modern applications, default in MySQL 8.0# collation_server = utf8mb4_general_ci
max_connections = 151 # Values < 1000 are typically goodmax_user_connections = 145 # Limit one specific user/applicationthread_cache_size = 151 # Up to max_connections makes sense
# Query Cache (does not exist in MySQL 8.0 any more!)
# query_cache_type = 1 # Set to 0 to avoid global QC Mutex# query_cache_size = 32M # Avoid too big (> 128M) QC because of QC clean-up lock!
# Session variables
sort_buffer_size = 2M # Could be too big for many small sortstmp_table_size = 32M # Make sure your temporary results do NOT contain BLOB/TEXT attributes
read_buffer_size = 128k # Resist to change this parameter if you do not know what you are doingread_rnd_buffer_size = 256k # Resist to change this parameter if you do not know what you are doingjoin_buffer_size = 128k # Resist to change this parameter if you do not know what you are doing
# Other buffers and caches
table_definition_cache = 1400 # As big as many tables you havetable_open_cache = 2000 # connections x tables/connection (~2)table_open_cache_instances = 16 # New default in 5.7
# MySQL error log
log_error = %INSTANCEDIR%/log/%UNAME%_%INSTANCE%_error.log # Adjust AppArmor configuration: /etc/apparmor.d/local/usr.sbin.mysqld# log_timestamps = SYSTEM # MySQL 5.7, equivalent to old behaviourlog_warnings = 2 # MySQL 5.6, equivalent to log_error_verbosity = 3# log_error_verbosity = 3 # MySQL 5.7, equivalent to log_warnings = 2, MariaDB does NOT support this!innodb_print_all_deadlocks = 1# wsrep_log_conflicts = 1 # for Galera only!
# Slow Query Log
slow_query_log_file = %INSTANCEDIR%/log/%UNAME%_%INSTANCE%_slow.log # Adjust AppArmor configuration: /etc/apparmor.d/local/usr.sbin.mysqldslow_query_log = 0log_queries_not_using_indexes = 0 # Interesting on developer systems!long_query_time = 0.5min_examined_row_limit = 100
# General Query Log
general_log_file = %INSTANCEDIR%/log/%UNAME%_%INSTANCE%_general.log # Adjust AppArmor configuration: /etc/apparmor.d/local/usr.sbin.mysqldgeneral_log = 0
# Performance Schema
# performance_schema = ON # for MariaDB 10 releasesperformance_schema_consumer_events_statements_history_long = ON # MySQL 5.6/MariaDB 10 and newer
# Binary logging and Replication
server_id = %SERVERID% # Must be set on MySQL 5.7 and newer if binary log is enabled!log_bin = %INSTANCEDIR%/binlog/%UNAME%_%INSTANCE%_binlog # Locate outside of datadir, adjust AppArmor configuration: /etc/apparmor.d/local/usr.sbin.mysqld# master_verify_checksum = ON # MySQL 5.6binlog_cache_size = 1Mbinlog_stmt_cache_size = 1Mmax_binlog_size = 128M # Make bigger for high traffic to reduce number of filessync_binlog = 1 # Set to 0 or higher to increase write performanceexpire_logs_days = 5 # We will survive easter holidaysbinlog_format = ROW # Use MIXED if you want to experience some troubles# binlog_row_image = MINIMAL # Since 5.6# auto_increment_increment = 2 # For Master/Master set-ups use 2 for both nodes# auto_increment_offset = 1 # For Master/Master set-ups use 1 and 2
# Slave variables
log_slave_updates = 1 # Use if Slave is used for Backup and PiTRread_only = 0 # Set to 1 to prevent writes on Slave# super_read_only = 0 # Set to 1 to prevent writes on Slave for users with SUPER privilege. Since 5.7, not in MariaDB# skip_slave_start = 1 # To avoid start of Slave thread# relay_log = %UNAME%_%INSTANCE%_relay-bin# relay_log_info_repository = table # MySQL 5.6# master_info_repository = table # MySQL 5.6# slave_load_tmpdir = '%INSTANCEDIR%/tmp'
# Crash-safe replication Master
# binlog_checksum = CRC32 # default# sync_binlog = 1 # default since 5.7.6, but slow!# innodb_support_xa = 1 # default, depracted since 5.7.10
# Crash-safe replication Slave
# master_info_repository = TABLE# relay_log_info_repository = TABLE# relay_log_recovery = 1# sync_relay_log_info = 1# relay_log_purge = 1 # default# slave_sql_verify_checksum = 1 # default
# GTID replication
# gtid_mode = ON # Master and Slave# enforce_gtid_consistency = 1 # Master and Slave
# log_bin = %INSTANCEDIR%/binlog/%UNAME%_%INSTANCE%_binlog # In 5.6 also on Slave# log_slave_updates = 1 # In 5.6 also on Slave
# Security variables
# local_infile = 0 # If you are security aware# secure_auth = 1 # If you are security aware# sql_mode = TRADITIONAL,ONLY_FULL_GROUP_BY,NO_ENGINE_SUBSTITUTION,STRICT_ALL_TABLES,NO_ZERO_IN_DATE,NO_ZERO_DATE,ERROR_FOR_DIVISION_BY_ZERO,NO_AUTO_CREATE_USER # Be careful changing this afterwards# skip_name_resolve = 0 # Set to 1 if you do not trust your DNS or experience problems# secure_file_priv = '%INSTANCEDIR%/tmp' # chmod 750, adjust AppArmor configuration: /etc/apparmor.d/local/usr.sbin.mysqld
# MyISAM variables
key_buffer_size = 8M # Set to 25 - 33 % of RAM if you still use MyISAMmyisam_recover_options = 'BACKUP,FORCE'# disabled_storage_engines = 'MyISAM,MEMORY' # MySQL 5.7, do NOT during/before mysql_upgrade, good for Galera!
# MEMORY variables
max_heap_table_size = 64M # Should be greater or equal to tmp_table_size
# InnoDB variables
innodb_strict_mode = ON# innodb_file_format_check = 1 # Desupported in MySQL 8.0# innodb_file_format = Barracuda # For dynamic and compressed InnoDB tables, default in 5.7innodb_buffer_pool_size = 128M # Go up to 80% of your available RAMinnodb_buffer_pool_instances = 8 # Bigger if huge InnoDB Buffer Pool or high concurrency
innodb_file_per_table = 1 # Is the recommended way nowadays# innodb_flush_method = O_DIRECT # O_DIRECT is sometimes better for direct attached storage# innodb_write_io_threads = 8 # If you have a strong I/O system or SSD# innodb_read_io_threads = 8 # If you have a strong I/O system or SSD# innodb_io_capacity = 1000 # If you have a strong I/O system or SSD
innodb_flush_log_at_trx_commit = 2 # 1 for durability, 0 or 2 for performanceinnodb_log_buffer_size = 8M # Bigger if innodb_flush_log_at_trx_commit = 0innodb_log_file_size = 256M # Bigger means more write throughput but longer recovery time
# Since MariaDB 10.0 and MySQL 5.6innodb_monitor_enable = all # Overhead < 1% according to PeterZ/Percona
# Galera specific MySQL parameter
# default_storage_engine = InnoDB # Galera only works with InnoDB# innodb_flush_log_at_trx_commit = 2 # Durability is achieved by committing to the Group# innodb_autoinc_lock_mode = 2 # For parallel applying# binlog_format = row # Galera only works with RBR# query_cache_type = 0 # Use QC with Galera only in a Master/Slave set-up# query_cache_size = 0
# WSREP parameter
# wsrep_on = on # Only MariaDB >= 10.1# wsrep_provider = /usr/lib/galera/libgalera_smm.so # Location of Galera Plugin on Ubuntu ?# wsrep_provider = /usr/lib64/galera-3/libgalera_smm.so # Location of Galera Plugin on CentOS 7# wsrep_provider = none # Start mysqld without Galera# wsrep_provider_options = 'gcache.size = 1G' # Depends on you workload, WS kept for IST
# wsrep_cluster_name = "My cool Galera Cluster" # Same Cluster name for all nodes# wsrep_cluster_address = "gcomm://192.168.0.2,192.168.0.3" # Start other nodes like this
# wsrep_node_name = "Node A" # Unique node name# wsrep_node_address = 192.168.0.1 # Our address where replication is done# wsrep_node_incoming_address = 10.0.0.1 # Our external interface where application comes from# wsrep_sync_wait = 1 # If you need realy full-synchronous replication (Galera 3.6 and newer)# wsrep_slave_threads = 16 # 4 - 8 per core, not more than wsrep_cert_deps_distance
# wsrep_sst_method = rsync # SST method (initial full sync): mysqldump, rsync, rsync_wan, xtrabackup-v2# wsrep_sst_auth = sst:secret # Username/password for sst user# wsrep_sst_receive_address = 192.168.2.1 # Our address where to receive SST
# Group Replication parameter
# default_storage_engine = InnoDB # Group Replication only works with InnoDB# server_id = %SERVERID% # Should be different on all 3 nodes# log_bin = %INSTANCEDIR%/binlog/%UNAME%_%INSTANCE%_binlog # Locate outside of datadir, adjust AppArmor configuration: /etc/apparmor.d/local/usr.sbin.mysqld# binlog_format = ROW# binlog_checksum = NONE # not default!# gtid_mode = ON# enforce_gtid_consistency = ON# master_info_repository = TABLE# relay_log_info_repository = TABLE# log_slave_updates = ON
# slave_parallel_workers = <n> # 1-2/core, max. 10# slave_preserve_commit_order = ON# slave_parallel_type = LOGICAL_CLOCK
# transaction_write_set_extraction = XXHASH64
# loose-group_replication_group_name = "$(uuidgen)" # Must be the same on all nodes# loose-group_replication_start_on_boot = OFF# loose-group_replication_local_address = "192.168.0.1"# loose-group_replication_group_seeds = "192.168.0.1,192.168.0.2,192.168.0.3" # All nodes of Cluster# loose-group_replication_bootstrap_group = OFF# loose-group_replication_single_primary_mode = FALSE # = multi-primary【6】Mac修改密码
(1)关闭mysql服务
sudo /usr/local/mysql/support-files/mysql.server stop(2)安全模式启动mysql
sudo /usr/local/mysql/bin/mysqld_safe --skip-grant-tables(3)重新打开一个终端
mysql -uroot -p- 输密码的位置直接 enter 进入
(4)修改密码
FLUSH PRIVILEGES;SET PASSWORD FOR root@'localhost' = PASSWORD('重新设置的密码');- 关于mysql修改密码 set password for root@localhost = password(‘xxx’);报错
SET PASSWORD FOR root@localhost = '你重新设置的密码';(5)重启MySQL服务即可
sudo /usr/local/mysql/support-files/mysql.server stopsudo /usr/local/mysql/support-files/mysql.server start【五】MySQL数据库配置
【1】登陆和退出
(1)登陆
- 通过以下命令按回车键,接着输入上面初始化的登陆密码,就可以登陆MySQL交互终端了。
mysql -uroot -p- 注意:mysql与linux一样,在安装成功以后默认就存在了一个上帝一般的用户,叫root。
mysql -h 127.0.0.1 -P 3306 -uroot -p(2)退出
exit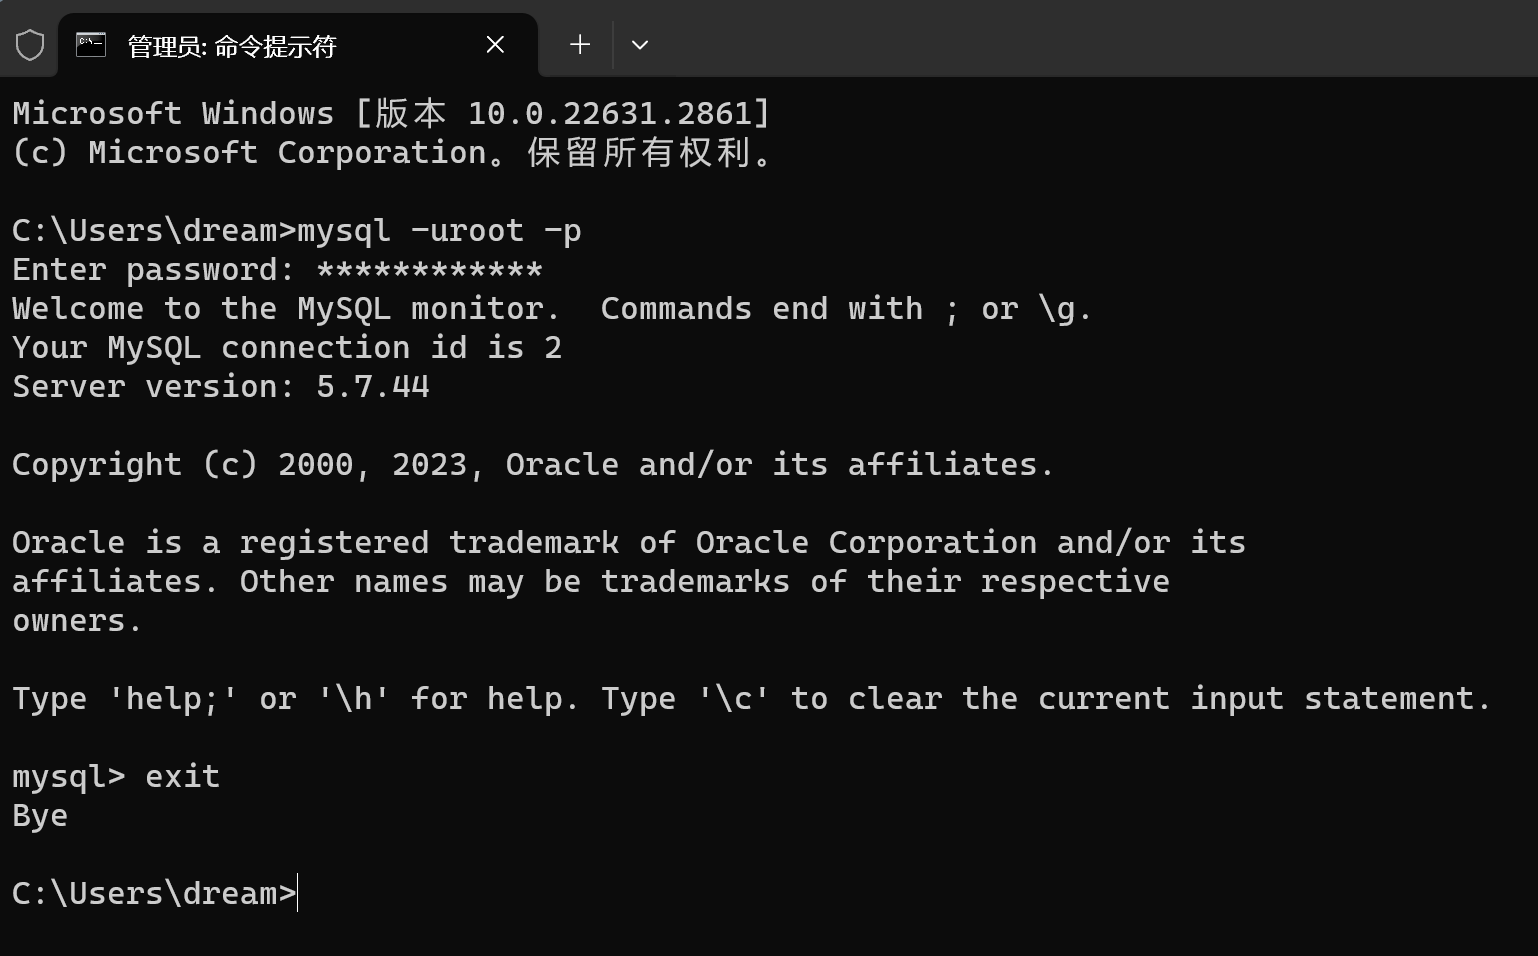
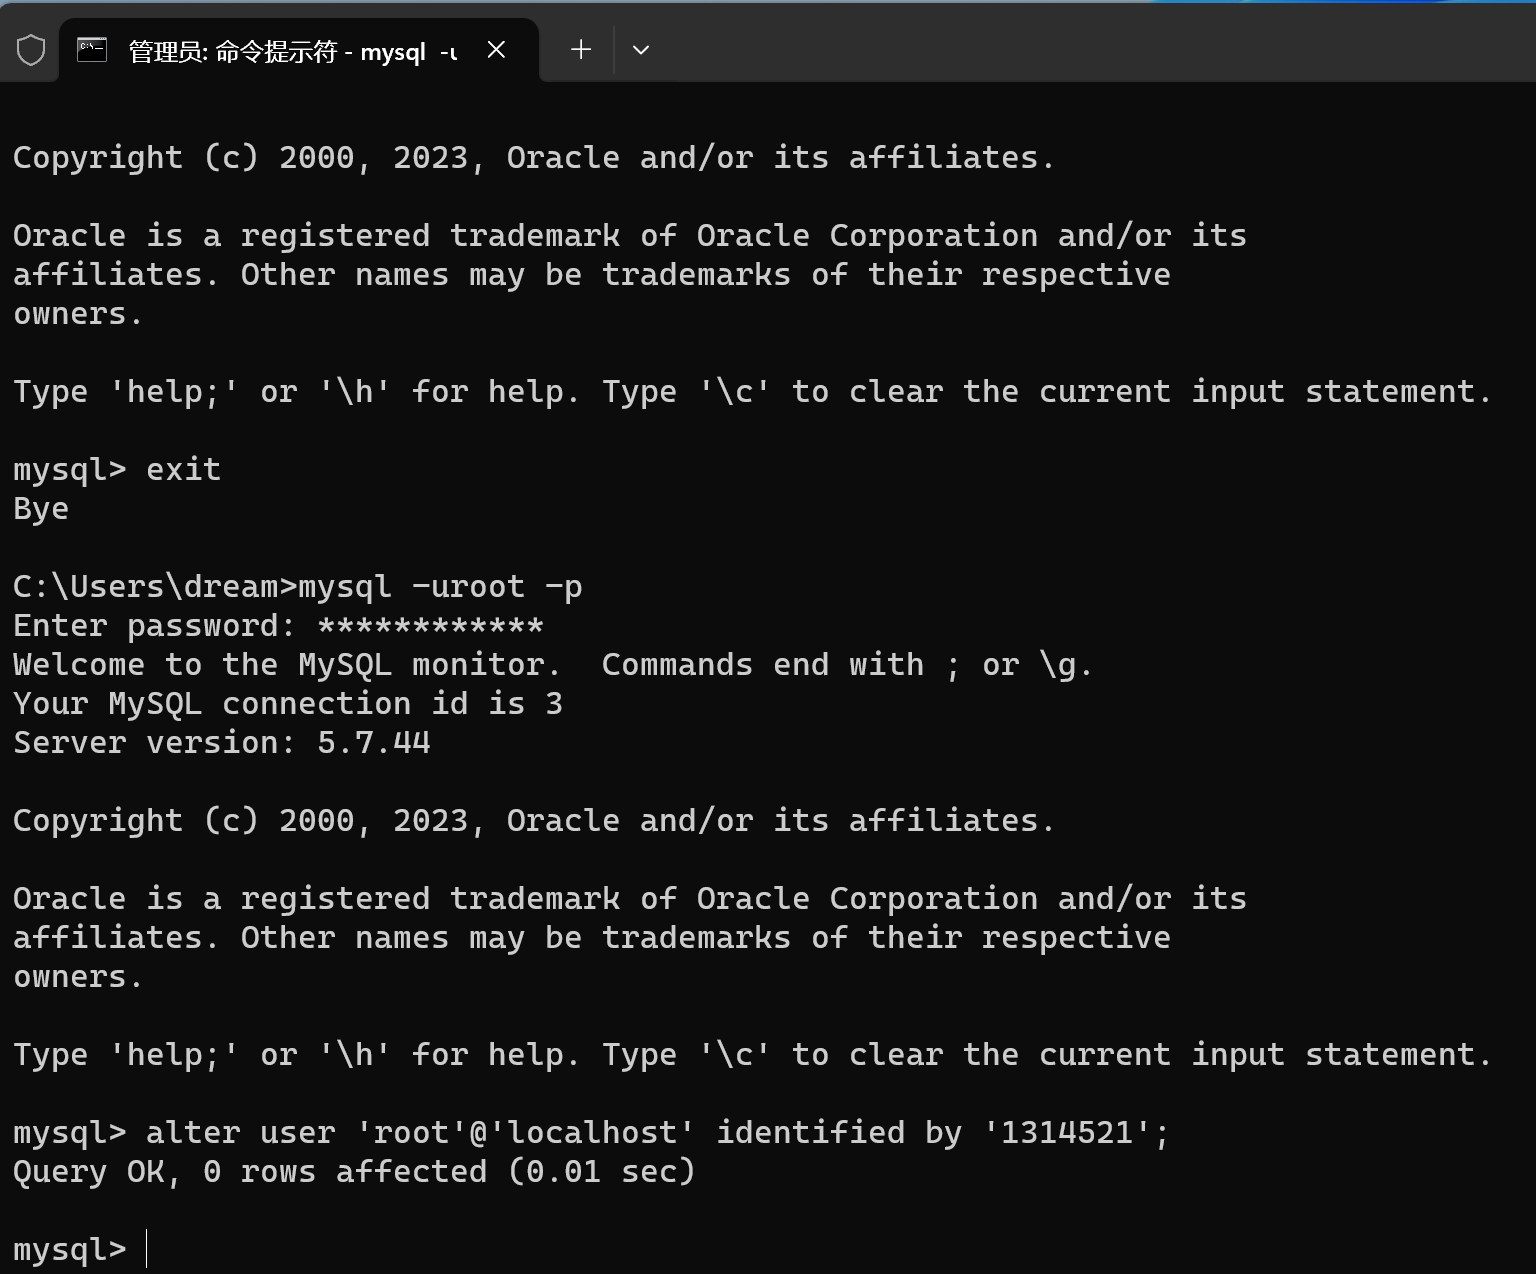
【2】修改用户名密码
- 前提是能正常进入到客户端内部
alter user 'root'@'localhost' identified by '123456';
flush privileges;
-- 这两种连接方式密码都必须修改
-- 修改远程连接密码ALTER USER 'root'@'%' IDENTIFIED BY 'password';-- 修改本地连接密码ALTER USER 'root'@'localhost' IDENTIFIED BY 'password';- 参数介绍
- ‘root’ :就是要修改密码的用户名
- ‘localhost’ :表示允许用户在什么地址下可以使用密码登陆到数据库服务器,localhost表示本地登陆
- ‘123456’ :就是新的密码了,注意,不要设置空密码!以后公司里面的密码一定要非常难记的才最好。
【3】跳过授权表重置密码
- 原理:将登录验证装饰器的校验功能取消
(1)关闭MySQL服务
net stop MySQL(2)跳过授权表
mysqld --skip-grant-tables(3)无密码登入
- 输入密码的位置直接 enter
mysql -uroot -p(4)修改当前用户密码
- 真正存储用户表的密码字段,存储的肯定是密文
- 只有用户自己知道明文是什么
- 密码比对只能比对密文
alter user 'root'@'localhost' identified by '1314521';(5)刷新权限数据
flush privileges;(6)重新进入MySQL
- 关闭当前服务,以正常方式登入数据库
【4】不需要输入密码直接登入
- 修改 配置文件 mysql.ini
- 在服务块内添加以下配置
[mysql]# 不需要每次输入验证码即可登陆user="root"password=你的密码default-character-set=utf8mb4【5】赋予用户权限
-- 进入mysqlmysql -u root -p-- 切换进入 mysql 数据库use mysql;-- 授予用户远程访问权限update user set host = '%' where user = 'root';-- 授予用户本地访问权限update user set host = 'localhost' where user = 'root';-- 刷新权限FLUSH PRIVILEGES;【补充】删除 Windows 中的「服务」
【一】Windows 中的「服务」可以分为两大类
【1】Windows 服务
- 在大多数情况下,尝试删除「Windows 服务」并不是一个好主意。
- 其中许多服务执行了 Windows 系统的基本功能,删除它们可能会使计算机崩溃。
【2】第三方服务
- 是由安装的应用程序创建的。大多数应用程序创建的「服务」主要是提供一些后台功能,但我们也可以删除一些不常用的第三方服务,以释放系统性能。
【3】小结
- 其实,一些 Windows 服务也属于「可有可无」的范围,可以在不影响核心系统功能的情况下停止和删除。
- 但我们强烈建议,不要去删除 Windows 默认的服务。
【二】方法 1:使用「注册表」删除 Windows 服务
【1】什么是注册表
- 注册表是 Windows 操作系统和应用程序存储其低层级配置的数据库,当然也包括了「服务」。
- 在 Windows 中删除任何「服务」最简单方法就是使用「注册表编辑器」:
【2】终端打开注册表
- 使用 **Windows + R **快捷键打开「运行」
- 执行 **regedit **打开「注册表编辑器」
【3】导航到注册表
计算机\HKEY_LOCAL_MACHINE\SYSTEM\CurrentControlSet\Services【4】选择服务进行删除
- Windows 上的所有「服务」都由Services目录中的键表示
- 只需右击要删除的服务名称,然后选择删除即可。
【5】小结
- 下次重新启动 PC 时,该「服务」将会被直接删除。
【三】方法 2:使用「命令提示符」删除 Windows 服务
【1】引言
- 「命令提示符」提供了另一种删除「服务」的简单方法
- 但前提是需要知道想要删除的「服务名称」
- 所以需要先查看服务名称
【2】打开终端
- 在「开始」菜单中搜索 cmd
- 以管理员身份打开「命令提示符」
【3】查看所有服务
- 执行以下命令列出当前 Windows 系统中的所有服务和名称:
sc queryex type=service state=all【4】删除服务
- 可以执行以下命令删除任何不需要的服务:
sc delete 服务名称【5】提示
- 命令执行成功后会有反馈输出进行提示。
【6】小结
- 命令执行成功后「服务」会被立即删除,不用重启计算机。
【四】方法 3:使用「Windows PoserShell」删除 Windows 服务
【1】引言
- 对于许多用户来说,PowerShell 命令比「命令提示符」更有用、更方便。
- PowerShell cmdlet 可无限重复使用,允许系统管理员通过运行单个脚本来执行日常任务。
【2】打开Powershell
- 在「开始」菜单中搜索powershell
- 以管理员身份打开「Windows PowerShell」
【3】查看所有服务
- PowerShell 也可以显示 Windows 系统中所有「服务」的名称
- 只需使用以下命令即可查看服务列表:
Get-Service【4】删除服务
- 可以执行以下命令删除任何不需要的服务:
sc delete 服务名称【5】提示
- 命令执行成功后除报错外不会有成功提示。
【6】小结
- 下次重新启动 PC 时,该「服务」将会被直接删除。
【五】方法 4:使用 Autoruns 删除 Windows 服务
【1】引言
- 如果你觉得「注册表」和命令行的操作方式太过复杂或麻烦
- 可以尝试使用 sysinternals 工具集里面的图形化小工具 Autoruns 来删除 Windows 服务
【2】下载autoruns
- 先去到 autoruns 工具的官网下载它
- 右击选择「以管理员身份运行」打开它
【3】查看服务
- 切换到「Services」选项卡,可以查看在当前 Windows 中注册的所有「服务」。
- Autoruns 还会标识「服务」的发布者是否经过验证,帮助你轻松剔除无良第三方服务。
【4】删除服务
- 右键单击要删除的任何「服务」
- 然后从出现的下拉菜单中选择「Delete」即可删除该服务。
【5】小结
- 操作执行成功后「服务」会被立即删除,不用重启计算机。
支持与分享
如果这篇文章对你有帮助,欢迎分享给更多人或打赏支持!
相关文章智能推荐
1
C 语言数据类型
编程语言理解 C 语言的数据类型体系,包括基本类型、整数类型、浮点类型和逻辑类型。
2
C 语言开发环境的安装与配置
编程语言在 Windows、Linux 与 macOS 上安装 C 工具链,配置编辑器,并编译运行第一个 C 程序。
3
C 语言基础:注释、关键字、变量与数据类型
编程语言学习 C 语言的注释、关键字、标识符、常量、变量和基本数据类型等基础知识。
4
C 语言发展史
编程语言了解 C 语言从 BCPL、B 语言到现代标准 C 的发展历程、核心特点与应用领域。
5
C 语言初识:程序运行机制与基本结构
编程语言认识 C 程序从源代码到运行的完整流程,以及基础语法和程序的基本结构。
随机文章随机推荐

Dream
Hello, I'm Dream.
欢迎来到我的博客!爱学习爱进步。
文章
300
分类
5
标签
26
总字数
640,882
运行时长
0 天
最后活动
0 天前
站点域名firefly.cuteleaf.cn
Fireflyv6.16.8
Astrov7.3.2
Nodev24.21.0
pnpmv11.22.0
构建时间2026年9月27日 14:40:24
系统信息Linux / x86_64