


PyMySQL模块
3413 字
17 分钟
PyMySQL模块
- 1数据库初识
- 2SQL语句介绍
- 3MySQL数据库安装
- 4SQL语句基础
- 5SQL语句操作MySQL数据库基础
- 6MySQL之存储引擎
- 7MySQL之基本数据类型
- 8MySQL之约束条件
- 9MySQL之过滤条件
- 10多表查询和子查询
- 11多表查询练习题
- 12Navicate安装
- 13PDManer(元数建模)
- 14Tabby
- 15PyMySQL模块本文
- 16MySQL进阶知识之视图
- 17MySQL进阶知识之触发器
- 18MySQL进阶知识之事务
- 19MySQL进阶知识之存储过程
- 20MySQL进阶知识之函数
- 21MySQL进阶知识之流程控制
- 22MySQL进阶知识之索引
- 23MySQL进阶知识之事务隔离机制
- 24MySQL进阶知识之锁机制
- 25数据库的三大范式
- 26MySQL数据库小结
【一】Python操作数据库简介
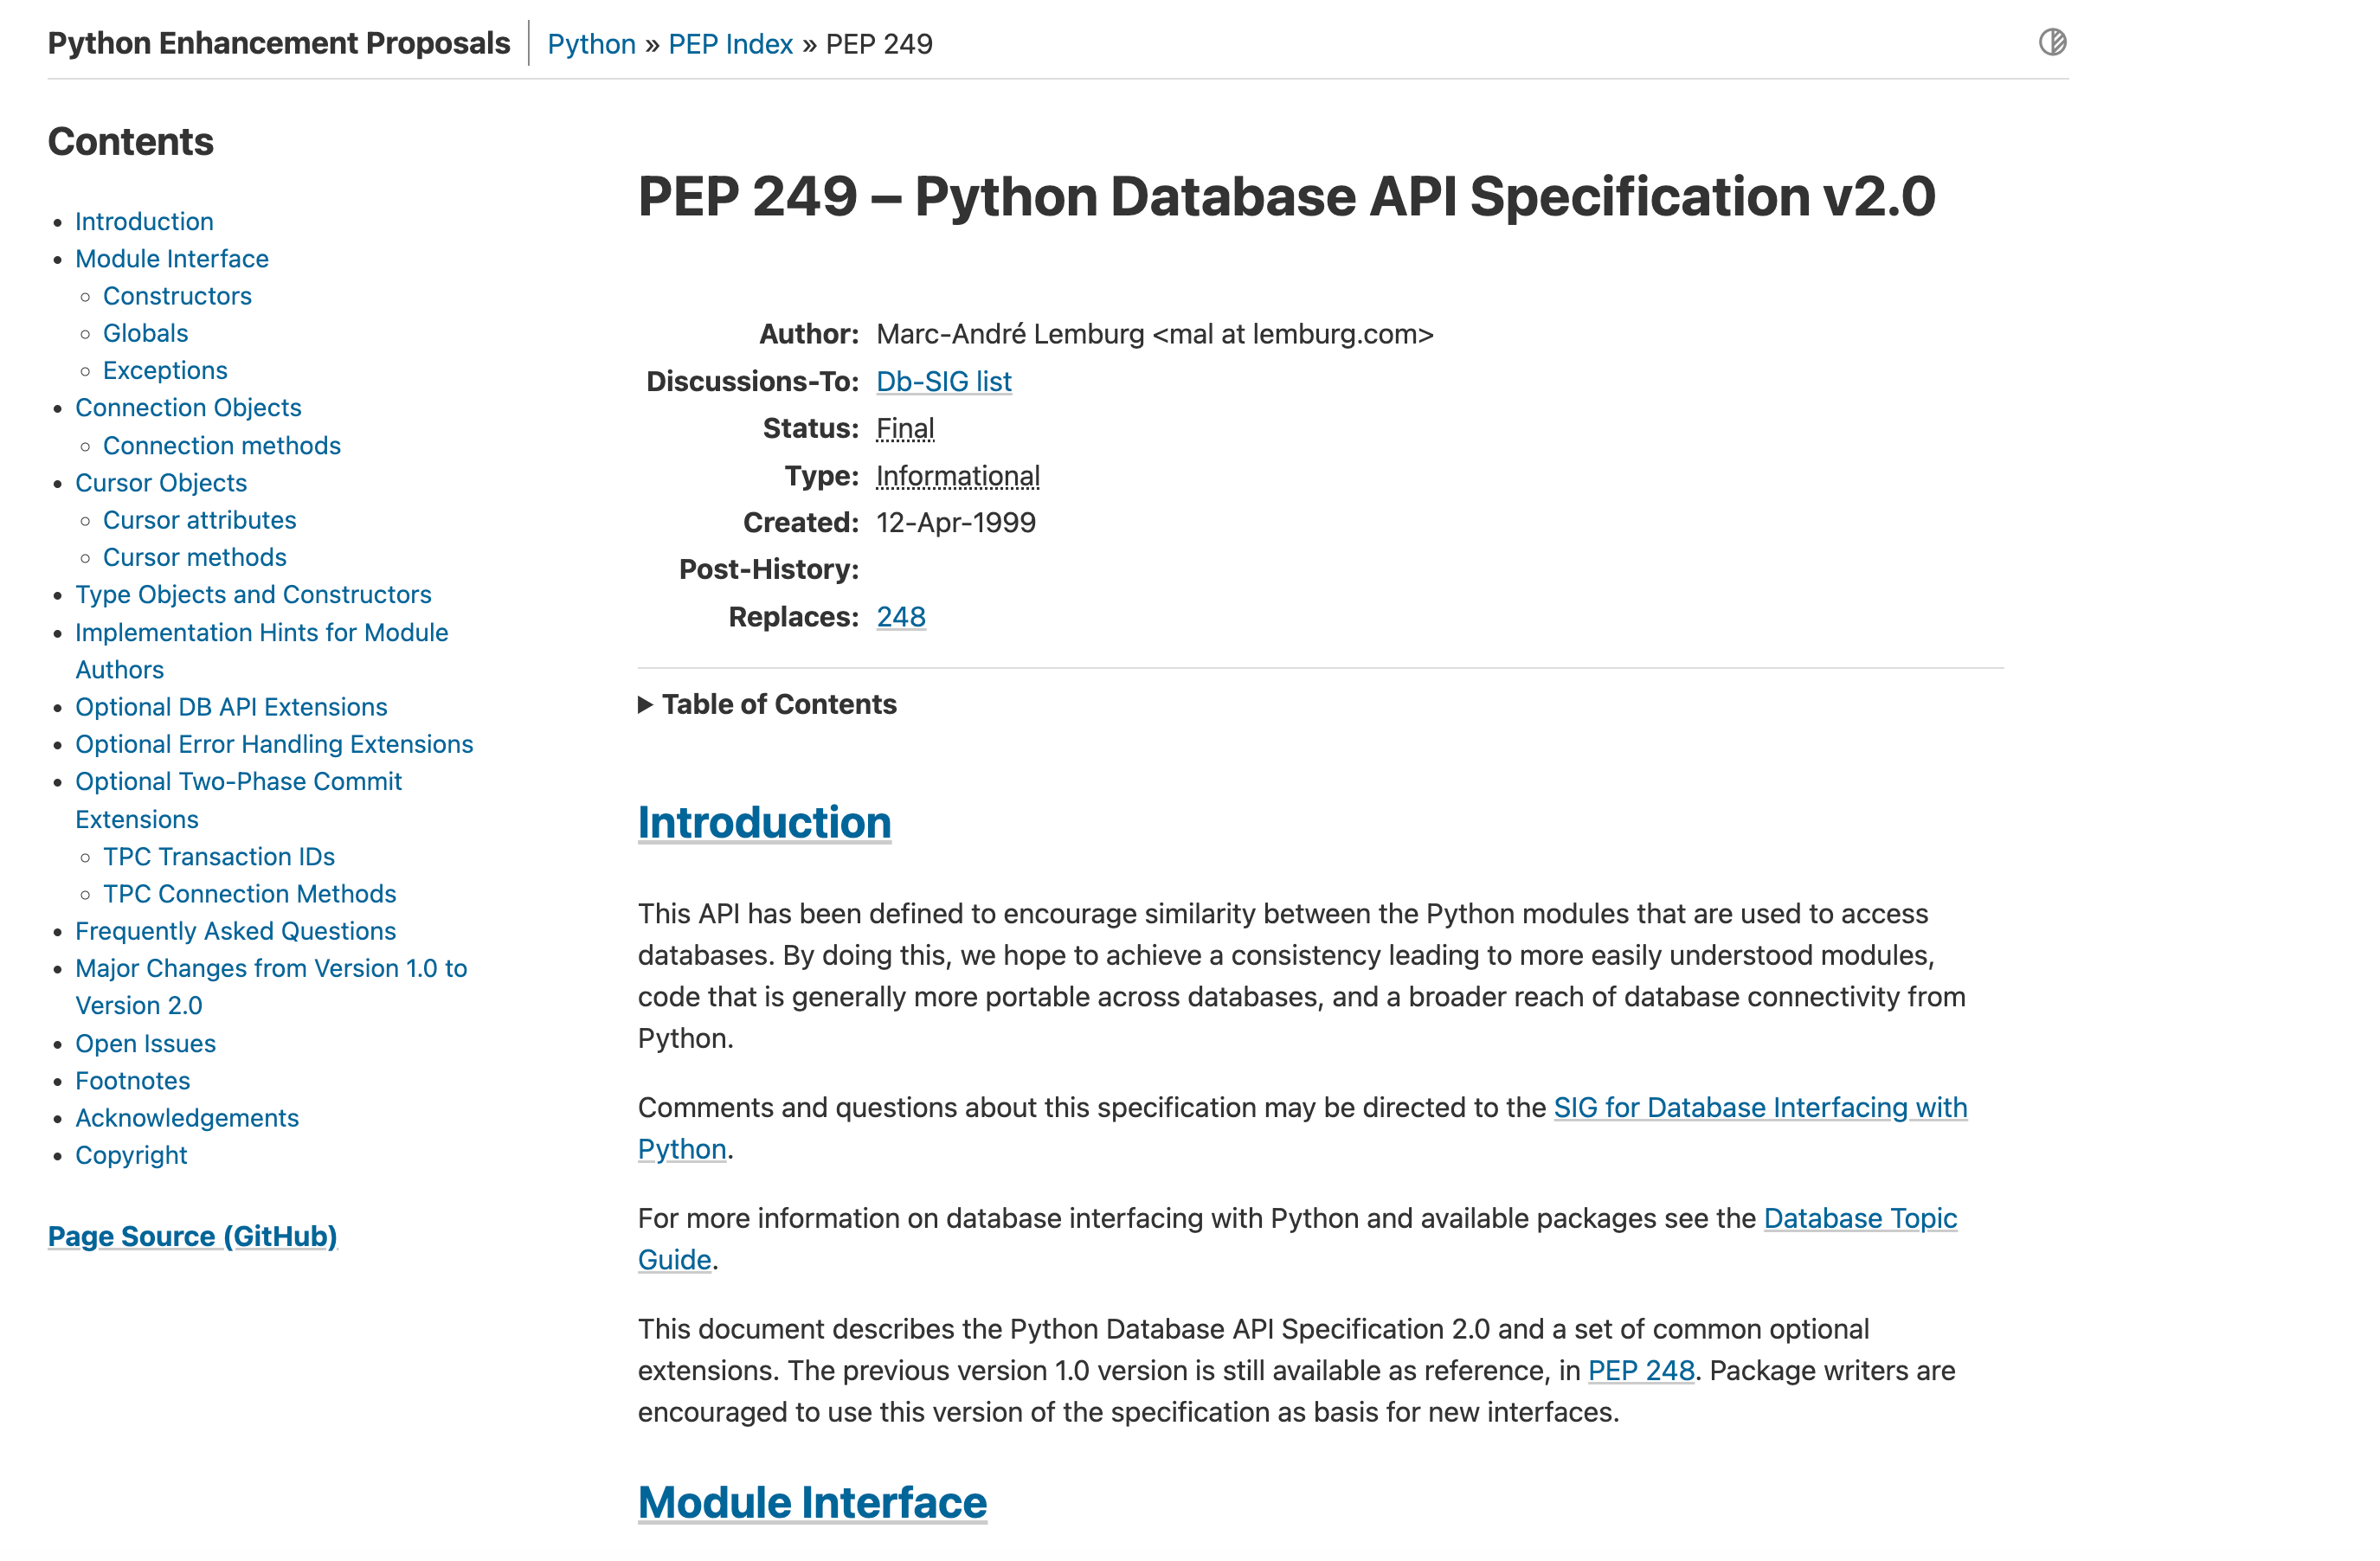
【1】什么是DB-API
- Python标准数据库规范为 DB-API, DB-API定义了一系列必须的对象和数据库操作方式,以便为各种数据库系统和数据库访问程序提供一致的访问接口。
【2】数据库操作模块
- 开发人员将接口封装成不同的数据库操作模块,不同的数据库需要不同数据库操作模块
- 例如,MySQL数据库,它对应以下操作模块:https://wiki.python.org/moin/MySQL

- 最常用的应该是
- MySQL-python:也就是MySQLdb,底层是通过C操作MySQL,效率高,但是只支持py2,不支持py3。
- mysqlclient:是MySQL-python的一个分支。它增加了Python 3支持,并修复了许多错误。Django文档推荐的MySQL依赖库。
- PyMySQL:纯Python实现的模块,可以与Python代码兼容衔接,并也几乎兼容MySQL-python。
- MySQL Connector/Python:MySQL官方推出的纯Python实现的模块。
【二】PyMySQL简介
- 纯Python实现的模块,可以与Python代码兼容衔接,并也几乎兼容MySQL-python。
- 遵循 Python 数据库 API v2.0 规范。
- 官网:https://zetcode.com/python/pymysql/
【三】PyMySQL使用
【0】安装
pip install pymysql【1】连接数据库
- 使用connect函数创建连接对象,此连接对象提供关闭数据库、事务提交、事务回滚等操作。
- 传入参数有很多,具体参考文档,一般参数基本连接信息 host, user, password, port(默认为3306), database。
(1)连接语法
# 导入pymysql模块import pymysql
# 创建连接对象conn = pymysql.connect(user='root', # 必填参数:数据库连接用户名 password='password', # 必填参数:数据库连接密码 host='127.0.0.1', # 必填参数:数据库服务器地址,本地可以填 localhost 或 127.0.0.1 port=3306, # 必填参数:MySQL数据库端口,默认是3306 database='test' # 必填参数:需要链接那个数据库 )def __init__( self, *, user=None, # The first four arguments is based on DB-API 2.0 recommendation. password="", host=None, database=None, unix_socket=None, port=0, charset="", collation=None, sql_mode=None, read_default_file=None, conv=None, use_unicode=True, client_flag=0, cursorclass=Cursor, init_command=None, connect_timeout=10, read_default_group=None, autocommit=False, local_infile=False, max_allowed_packet=16 * 1024 * 1024, defer_connect=False, auth_plugin_map=None, read_timeout=None, write_timeout=None, bind_address=None, binary_prefix=False, program_name=None, server_public_key=None, ssl=None, ssl_ca=None, ssl_cert=None, ssl_disabled=None, ssl_key=None, ssl_verify_cert=None, ssl_verify_identity=None, compress=None, # not supported named_pipe=None, # not supported passwd=None, # deprecated db=None, # deprecated)【2】主要方法介绍
| 方法 | 功能 |
|---|---|
| cursor() | 获取游标对象,操作数据库,如执行DML操作,调用存储过程等 |
| commit() | 提交事务 |
| rollback() | 回滚事务 |
| close() | 关闭数据库连接 |
【3】操作MySQL数据库
- 使用Cursor对象与数据库进行交互。
- 具体方法参考:https://pymysql.readthedocs.io/en/latest/modules/cursors.html
(1)创建游标对象
import pymysqlconn = pymysql.connect( host='127.0.0.1', user='root', password='123456', port=3306, database='data')# 创建游标,查询数据以元组形式返回# cursor = conn.cursor()
# 创建游标,查询数据以字典形式返回cursor = conn.cursor(pymysql.cursors.DictCursor)(2)执行SQL语句
# 导入pymysql模块import pymysqlfrom pymysql.cursors import DictCursor
# 连接数据库,创建连接对象conn = pymysql.connect( host='127.0.0.1', user='root', password='1314521', port=3306, database='emp_data')# 创建游标,查询数据以元组形式返回# cursor = conn.cursor()
# 创建游标,查询数据以字典形式返回cursor = conn.cursor(DictCursor)
sql = 'select * from emp limit 10'cursor.execute(sql)【4】查询结果
(1)获取所有结果(fetchall)
# 导入pymysql模块import pymysqlfrom pymysql.cursors import DictCursor
# 连接数据库,创建连接对象conn = pymysql.connect( host='127.0.0.1', user='root', password='1314521', port=3306, database='emp_data')# 创建游标,查询数据以元组形式返回# cursor = conn.cursor()
# 创建游标,查询数据以字典形式返回cursor = conn.cursor(DictCursor)
sql = 'select * from emp limit 10'cursor.execute(sql)result = cursor.fetchall() # 返回所有数据print(result)[{'id': 1, 'name': 'dream', 'sex': 'male', 'age': 78, 'hire_date': datetime.date(2022, 3, 6), 'post': '陌夜痴梦久生情', 'post_comment': None, 'salary': 730.33, 'office': 401, 'depart_id': 1}, {'id': 2, 'name': 'mengmeng', 'sex': 'female', 'age': 25, 'hire_date': datetime.date(2022, 1, 2), 'post': 'teacher', 'post_comment': None, 'salary': 12000.5, 'office': 401, 'depart_id': 1}, {'id': 3, 'name': 'xiaomeng', 'sex': 'male', 'age': 35, 'hire_date': datetime.date(2019, 6, 7), 'post': 'teacher', 'post_comment': None, 'salary': 15000.99, 'office': 401, 'depart_id': 1}, {'id': 4, 'name': 'xiaona', 'sex': 'female', 'age': 29, 'hire_date': datetime.date(2018, 9, 6), 'post': 'teacher', 'post_comment': None, 'salary': 11000.8, 'office': 401, 'depart_id': 1}, {'id': 5, 'name': 'xiaoqi', 'sex': 'female', 'age': 27, 'hire_date': datetime.date(2022, 8, 6), 'post': 'teacher', 'post_comment': None, 'salary': 13000.7, 'office': 401, 'depart_id': 1}, {'id': 6, 'name': 'suimeng', 'sex': 'male', 'age': 33, 'hire_date': datetime.date(2023, 3, 6), 'post': 'teacher', 'post_comment': None, 'salary': 14000.62, 'office': 401, 'depart_id': 1}, {'id': 7, 'name': '娜娜', 'sex': 'female', 'age': 69, 'hire_date': datetime.date(2010, 3, 7), 'post': 'sale', 'post_comment': None, 'salary': 300.13, 'office': 402, 'depart_id': 2}, {'id': 8, 'name': '芳芳', 'sex': 'male', 'age': 45, 'hire_date': datetime.date(2014, 5, 18), 'post': 'sale', 'post_comment': None, 'salary': 400.45, 'office': 402, 'depart_id': 2}, {'id': 9, 'name': '小明', 'sex': 'male', 'age': 34, 'hire_date': datetime.date(2016, 1, 3), 'post': 'sale', 'post_comment': None, 'salary': 350.8, 'office': 402, 'depart_id': 2}, {'id': 10, 'name': '亚洲', 'sex': 'female', 'age': 42, 'hire_date': datetime.date(2017, 2, 27), 'post': 'sale', 'post_comment': None, 'salary': 320.99, 'office': 402, 'depart_id': 2}](2)获取一行数据(fetchone)
# 导入pymysql模块import pymysqlfrom pymysql.cursors import DictCursor
# 连接数据库,创建连接对象conn = pymysql.connect( host='127.0.0.1', user='root', password='1314521', port=3306, database='emp_data')# 创建游标,查询数据以元组形式返回# cursor = conn.cursor()
# 创建游标,查询数据以字典形式返回cursor = conn.cursor(DictCursor)
sql = 'select * from emp limit 10'cursor.execute(sql)result = cursor.fetchone() # 返回一行数据print(result){'id': 1, 'name': 'dream', 'sex': 'male', 'age': 78, 'hire_date': datetime.date(2022, 3, 6), 'post': '陌夜痴梦久生情', 'post_comment': None, 'salary': 730.33, 'office': 401, 'depart_id': 1}(3)获取查询指定结果量(fetchmany)
# 导入pymysql模块import pymysqlfrom pymysql.cursors import DictCursor
# 连接数据库,创建连接对象conn = pymysql.connect( host='127.0.0.1', user='root', password='1314521', port=3306, database='emp_data')# 创建游标,查询数据以元组形式返回# cursor = conn.cursor()
# 创建游标,查询数据以字典形式返回cursor = conn.cursor(DictCursor)
sql = 'select * from emp limit 10'cursor.execute(sql)result = cursor.fetchmany(2)# fetchmany(size) 获取查询结果集中指定数量的记录,size默认为1print(result)[{'id': 1, 'name': 'dream', 'sex': 'male', 'age': 78, 'hire_date': datetime.date(2022, 3, 6), 'post': '陌夜痴梦久生情', 'post_comment': None, 'salary': 730.33, 'office': 401, 'depart_id': 1}, {'id': 2, 'name': 'mengmeng', 'sex': 'female', 'age': 25, 'hire_date': datetime.date(2022, 1, 2), 'post': 'teacher', 'post_comment': None, 'salary': 12000.5, 'office': 401, 'depart_id': 1}](4)移动光标
cursor.scroll(1, 'relative') # 相对于当前位置往后移动一个单位cursor.scroll(1, 'absolute') # 相对于起始位置往后移动一个单位【5】插入操作
- 插入操作中参数可以_以元组、列表和字典形式传入_
- 需要使用到占位符 “%s”,注意这只是个占位符,不同于Python 中字符串格式化中的转换说明符。
| 转换说明符 | 解释 |
|---|---|
| %d、%i | 转换为带符号的十进制数 |
| %o | 转换为带符号的八进制数 |
| %x、%X | 转换为带符号的十六进制数 |
| %e | 转化为科学计数法表示的浮点数(e 小写) |
| %E | 转化为科学计数法表示的浮点数(E 小写) |
| %f、%F | 转化为十进制浮点数 |
| %g | 智能选择使用 %f 或 %e 格式 |
| %G | 智能选择使用 %F 或 %E 格式 |
| %c | 格式化字符及其ASCII码 |
| %r | 使用 repr() 函数将表达式转换为字符串 |
| %s | 使用 str() 函数将表达式转换为字符串 |
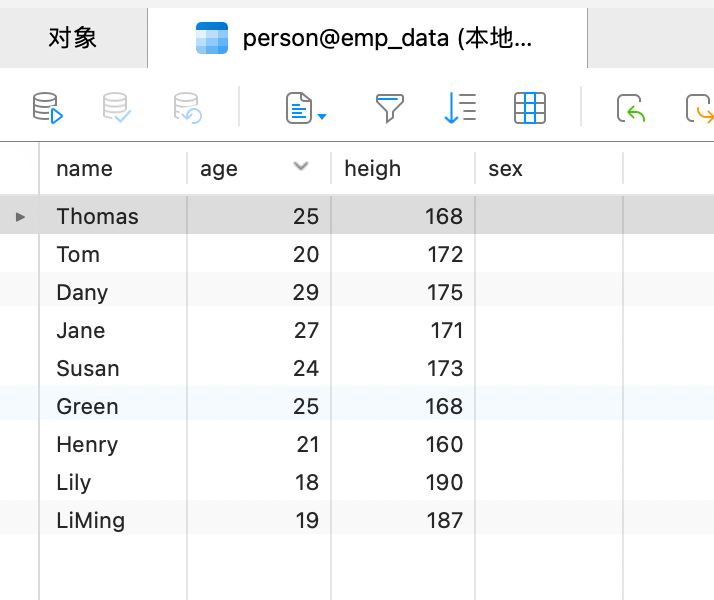
- 未插入之前
# 导入pymysql模块import pymysqlfrom pymysql.cursors import DictCursor
# 连接数据库,创建连接对象conn = pymysql.connect( host='127.0.0.1', user='root', password='1314521', port=3306, database='emp_data')# 创建游标,查询数据以元组形式返回# cursor = conn.cursor()
# 创建游标,查询数据以字典形式返回cursor = conn.cursor(DictCursor)
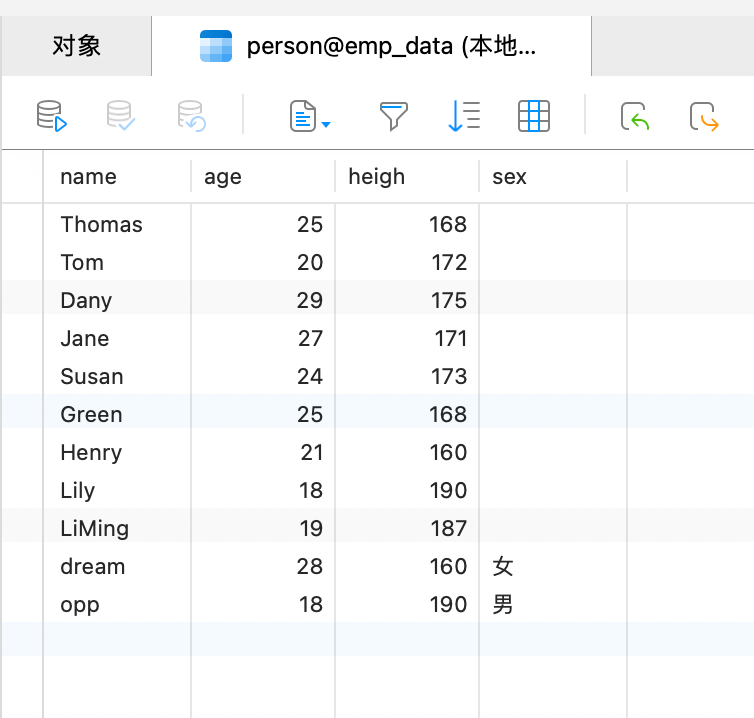
# 元组、列表形式传参sql = 'insert into person(NAME,AGE,HEIGH,SEX) VALUES(%s, %s, %s,%s)'cursor.execute(sql, ("dream", 28, 160, '女'))conn.commit()
# # 字典形式传参sql = 'insert into person(NAME,AGE,HEIGH,SEX) VALUES(%(person_name)s, %(person_age)s, %(person_height)s, %(person_sex)s)'cursor.execute(sql, {"person_height": 190, "person_name": "opp", "person_age": 18, 'person_sex': "男"})conn.commit()- 插入之后
【6】更新操作
# 导入pymysql模块import pymysqlfrom pymysql.cursors import DictCursor
# 连接数据库,创建连接对象conn = pymysql.connect( host='127.0.0.1', user='root', password='1314521', port=3306, database='emp_data')# 创建游标,查询数据以元组形式返回# cursor = conn.cursor()
# 创建游标,查询数据以字典形式返回cursor = conn.cursor(DictCursor)
sql = 'update person set SEX=%s where NAME = %s'cursor.execute(sql, ['保密', 'dream'])conn.commit()
【7】删除操作
# 导入pymysql模块import pymysqlfrom pymysql.cursors import DictCursor
# 连接数据库,创建连接对象conn = pymysql.connect( host='127.0.0.1', user='root', password='1314521', port=3306, database='emp_data')# 创建游标,查询数据以元组形式返回# cursor = conn.cursor()
# 创建游标,查询数据以字典形式返回cursor = conn.cursor(DictCursor)
sql = 'delete from person where NAME = %s'cursor.execute(sql, ['dream'])conn.commit()- 增删改需要有提交事务的操作,除了execute方法,还有批量操作方法executemany()。
【8】批量插入操作
# 导入pymysql模块import pymysqlfrom pymysql.cursors import DictCursor
# 连接数据库,创建连接对象conn = pymysql.connect( host='127.0.0.1', user='root', password='1314521', port=3306, database='emp_data')# 创建游标,查询数据以元组形式返回# cursor = conn.cursor()
# 创建游标,查询数据以字典形式返回cursor = conn.cursor(DictCursor)
sql = 'insert into person(NAME,AGE,HEIGH,SEX) VALUES(%s, %s, %s,%s)'param = [("kenny", 28, 190, "男"), ("liu", 28, 180, "女")] # 元组列表作为传入参数cursor.executemany(sql, param)conn.commit()【9】总结模版
import pymysqlfrom pymysql.cursors import DictCursor
class MySQLHandler(object): def __init__(self, host='127.0.0.1', port=3306, user='root', cursorclass=DictCursor, charset='utf8mb4', *, password, database): # 连接数据库,创建连接对象 self.conn = pymysql.connect( host=host, user=user, password=password, port=port, database=database, cursorclass=cursorclass, charset=charset ) # 创建游标对象 self.cursor = self.conn.cursor()
# 提交事务装饰监控器 @staticmethod def commit_sql(func): def inner(*args, **kwargs): self = args[0] try: res = func(*args, **kwargs) self.conn.commit() return res except Exception as e: self.conn.rollback() return e finally: self.close()
return inner
# 查询单条数据 @commit_sql def search_one(self, sql): self.cursor.execute(sql) result = self.cursor.fetchone() return result
# 查询所有数据 @commit_sql def search_all(self, sql): self.cursor.execute(sql) results = self.cursor.fetchall() return results
# 插入数据 @commit_sql def insert_data(self, table_name, **kwargs): if kwargs: sql = f'INSERT INTO {table_name} ({", ".join(kwargs.keys())}) VALUES {tuple(kwargs.values())}' else: sql = f'INSERT INTO {table_name} () VALUES ()' print(f'当前SQL语句 :>>>> {sql}') return self.cursor.execute(sql)
@commit_sql # 更新数据 def update_data(self, sql): self.cursor.execute(sql) return sql
# 关闭链接和服务对象 def close(self): self.cursor.close() self.conn.close()【四】SQL注入问题
【1】什么是SQL注入问题
- SQL注入是一种常见的网络攻击手法
- 它利用sql的语法特性和程序员编写程序时产生的漏洞,用一些特殊符号的组合产生特殊的含义,使得正常的sql语句失效,从而逃脱正常的业务逻辑,完成一些如跳过密码验证等的非法操作。
【2】产生原因
- SQL语句使用了动态拼接的方式。
【3】示例
(0)准备
- 创建表
create table user( id int primary key auto_increment, name varchar(32), password varchar(32));- 插入数据
insert into user(name,password) values("dream","521"),("chimeng","1314");- 查看数据
select * from user;+----+---------+----------+| id | name | password |+----+---------+----------+| 1 | dream | 521 || 2 | chimeng | 1314 |+----+---------+----------+2 rows in set (0.00 sec)(1)登录注册
import pymysql
def connect_mysql(): import pymysql
# (1)链接数据库 conn = pymysql.connect( # 指定 ip端口 host='127.0.0.1', port=3306,
# 指定用户名密码 user='root', password='1314521',
# 指定数据库 database='emp_data',
# 指定编码 charset='utf8' )
return conn
def create_cursor(username, password): conn = connect_mysql() # (2)创建游标对象 - 执行命令 对象 # cursor=pymysql.cursors.DictCursor:将查询的参数以字典的形式返回 cursor = conn.cursor(cursor=pymysql.cursors.DictCursor)
# (3)创建SQL语句 sql = 'select * from user where name = %s and password=%s;'%(username,password)
rows = cursor.execute(sql) return rows, cursor
def register(): username = input("username:>>>>").strip() password = input("password:>>>>").strip() rows, cursor = create_cursor(username, password) if rows: print("successfully login") print(cursor.fetchall()) else: print("Failed to login")
if __name__ == '__main__': register()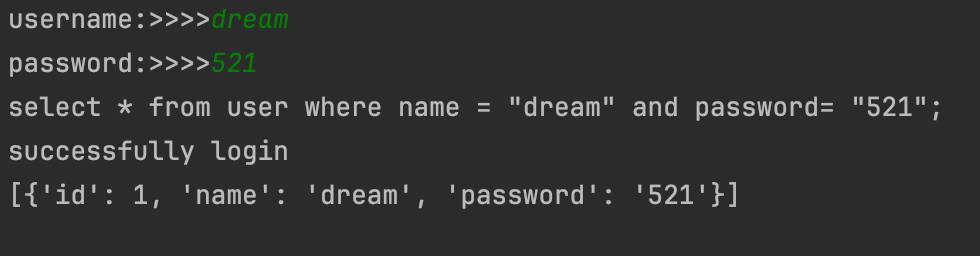
(2)问题
- 上面的登录注册SQL语句为
'select * from user where name = "%s" and password= "%s";' % (username, password)- 没有对用户的输入做任何处理,直接放到了SQL语句中。
- 那么,当黑客输入了dream OR 1=1 – dream 作为用户名时,原来的SQL语句就会变成下面的样子:
select * from user where name = dream or 1=1 -- dream and password="";- where name =dream or 1=1 是一个恒成立的条件,所以无论输入什么用户名都会返回True;
- 而 — 后面的语句被当作注释忽略掉了,密码验证也被跳过。
- 最终,绕过验证,成功登录。
【4】解决办法
- 针对参数不要采用拼接处理,交给pymysql中的方法(execute)自动处理,并对输入数据进行检查校验
# 元组,列表形式param = ('dream','123445')sql = 'SELECT username FROM user WHERE name = %s AND password = %s'cursor.execute(sql, param)
# 字典形式param = {'name':'hope','password':'123445'}sql = 'SELECT username FROM user WHERE name = %(name)s AND password = %(pwd)s'cursor.execute(sql, param)- 需要注意的是,不要因为参数是其他类型而换掉 %s,pymysql 的占位符并不是 python 的通用格式化转换说明符。
- 同时,也不要因为参数是 string 就在 %s 两边加引号,mysql 会自动去处理。
【五】PyMySQL进阶
【1】主动提交事务
- 因为在增删改查中,只有查的权限是最简单的,因此查无需过多的权限
- 但是增删改都涉及到数据库数据的变动,需要额外的确认才行(即提交事务)
import pymysql
def create_mysql_connection(): conn = pymysql.connect( # 指定 IP 和 PORT host='127.0.0.1', port=3306,
# 指定用户名和密码 user='root', password='1314521',
# 指定默认编码 charset='utf8',
# 指定数据库 database='day05', )
# 创建游标对象 cursor = conn.cursor(pymysql.cursors.DictCursor)
# 返回游标对象 return cursor, conn
cursor, conn = create_mysql_connection()
# 增加数据def add_data(): # (1) 拿到想要处理的数据 username = input("Username:>>>").strip() password = input("Password:>>>").strip()
# (2) 创建SQL语句 sql = "INSERT INTO user(name,password) values (%s,%s);"
# (3)查看SQL语句执行状态 rows = cursor.execute(sql, (username, password)) print(rows)
# (4) 提交事务 :确认此次数据库更改操作 conn.commit()
# 更改数据def change_data(): username = input("Username:>>>").strip() password = input("Password:>>>").strip() sql = "update user set name=%s, password=%s where id=1;"
rows = cursor.execute(sql, (username, password)) print(rows)
conn.commit()
# 删除数据def delete_data(): sql = "delete from user where id =1;"
rows = cursor.execute(sql) print(rows)
conn.commit()
# 查询数据def check_data(): sql = "select * from user" cursor.execute(sql) print(cursor.fetchall())
if __name__ == '__main__': # add_data() # change_data() # delete_data() check_data()【2】自动提交事务
import pymysql
def create_mysql_connection(): conn = pymysql.connect( # 指定 IP 和 PORT host='127.0.0.1', port=3306,
# 指定用户名和密码 user='root', password='1314521',
# 指定默认编码 charset='utf8',
# 指定数据库 database='day05',
# 自动提交事务 autocommit=True )
# 创建游标对象 cursor = conn.cursor(pymysql.cursors.DictCursor)
# 返回游标对象 return cursor, conn
cursor, conn = create_mysql_connection()
# 增加数据def add_data(): # (1) 拿到想要处理的数据 username = input("Username:>>>").strip() password = input("Password:>>>").strip()
# (2) 创建SQL语句 sql = "INSERT INTO user(name,password) values (%s,%s);"
# (3)查看SQL语句执行状态 rows = cursor.execute(sql, (username, password)) print(rows)
# 更改数据def change_data(): username = input("Username:>>>").strip() password = input("Password:>>>").strip() sql = "update user set name=%s, password=%s where id=1;"
rows = cursor.execute(sql, (username, password)) print(rows)
# 删除数据def delete_data(): sql = "delete from user where id =1;"
rows = cursor.execute(sql) print(rows)
# 查询数据def check_data(): sql = "select * from user" cursor.execute(sql) print(cursor.fetchall())
if __name__ == '__main__': # add_data() # change_data() # delete_data() check_data()支持与分享
如果这篇文章对你有帮助,欢迎分享给更多人或打赏支持!
相关文章智能推荐
1
C 语言发展史
编程语言了解 C 语言从 BCPL、B 语言到现代标准 C 的发展历程、核心特点与应用领域。
2
C 语言开发环境的安装与配置
编程语言在 Windows、Linux 与 macOS 上安装 C 工具链,配置编辑器,并编译运行第一个 C 程序。
3
C 语言初识:程序运行机制与基本结构
编程语言认识 C 程序从源代码到运行的完整流程,以及基础语法和程序的基本结构。
4
C 语言基础:注释、关键字、变量与数据类型
编程语言学习 C 语言的注释、关键字、标识符、常量、变量和基本数据类型等基础知识。
5
C 语言数据类型
编程语言理解 C 语言的数据类型体系,包括基本类型、整数类型、浮点类型和逻辑类型。
随机文章随机推荐

Dream
Hello, I'm Dream.
欢迎来到我的博客!爱学习爱进步。
文章
300
分类
5
标签
26
总字数
640,882
运行时长
0 天
最后活动
0 天前
站点域名firefly.cuteleaf.cn
Fireflyv6.16.8
Astrov7.3.2
Nodev24.21.0
pnpmv11.22.0
构建时间2026年9月27日 14:40:23
系统信息Linux / x86_64